How to Clean Between the Oven Glass: A Madison Guide
- Dec 10, 2025
- 11 min read
It’s a classic kitchen cleaning puzzle. You’ve scrubbed the oven door spotless, but there’s still a hazy, greasy film trapped between the glass panes. If you want to know how to clean between the oven glass, it means getting comfortable with taking the door apart just enough to reach those inner surfaces. A simple wipe on the outside just won’t cut it.
Why Oven Door Glass Gets So Grimy on the Inside
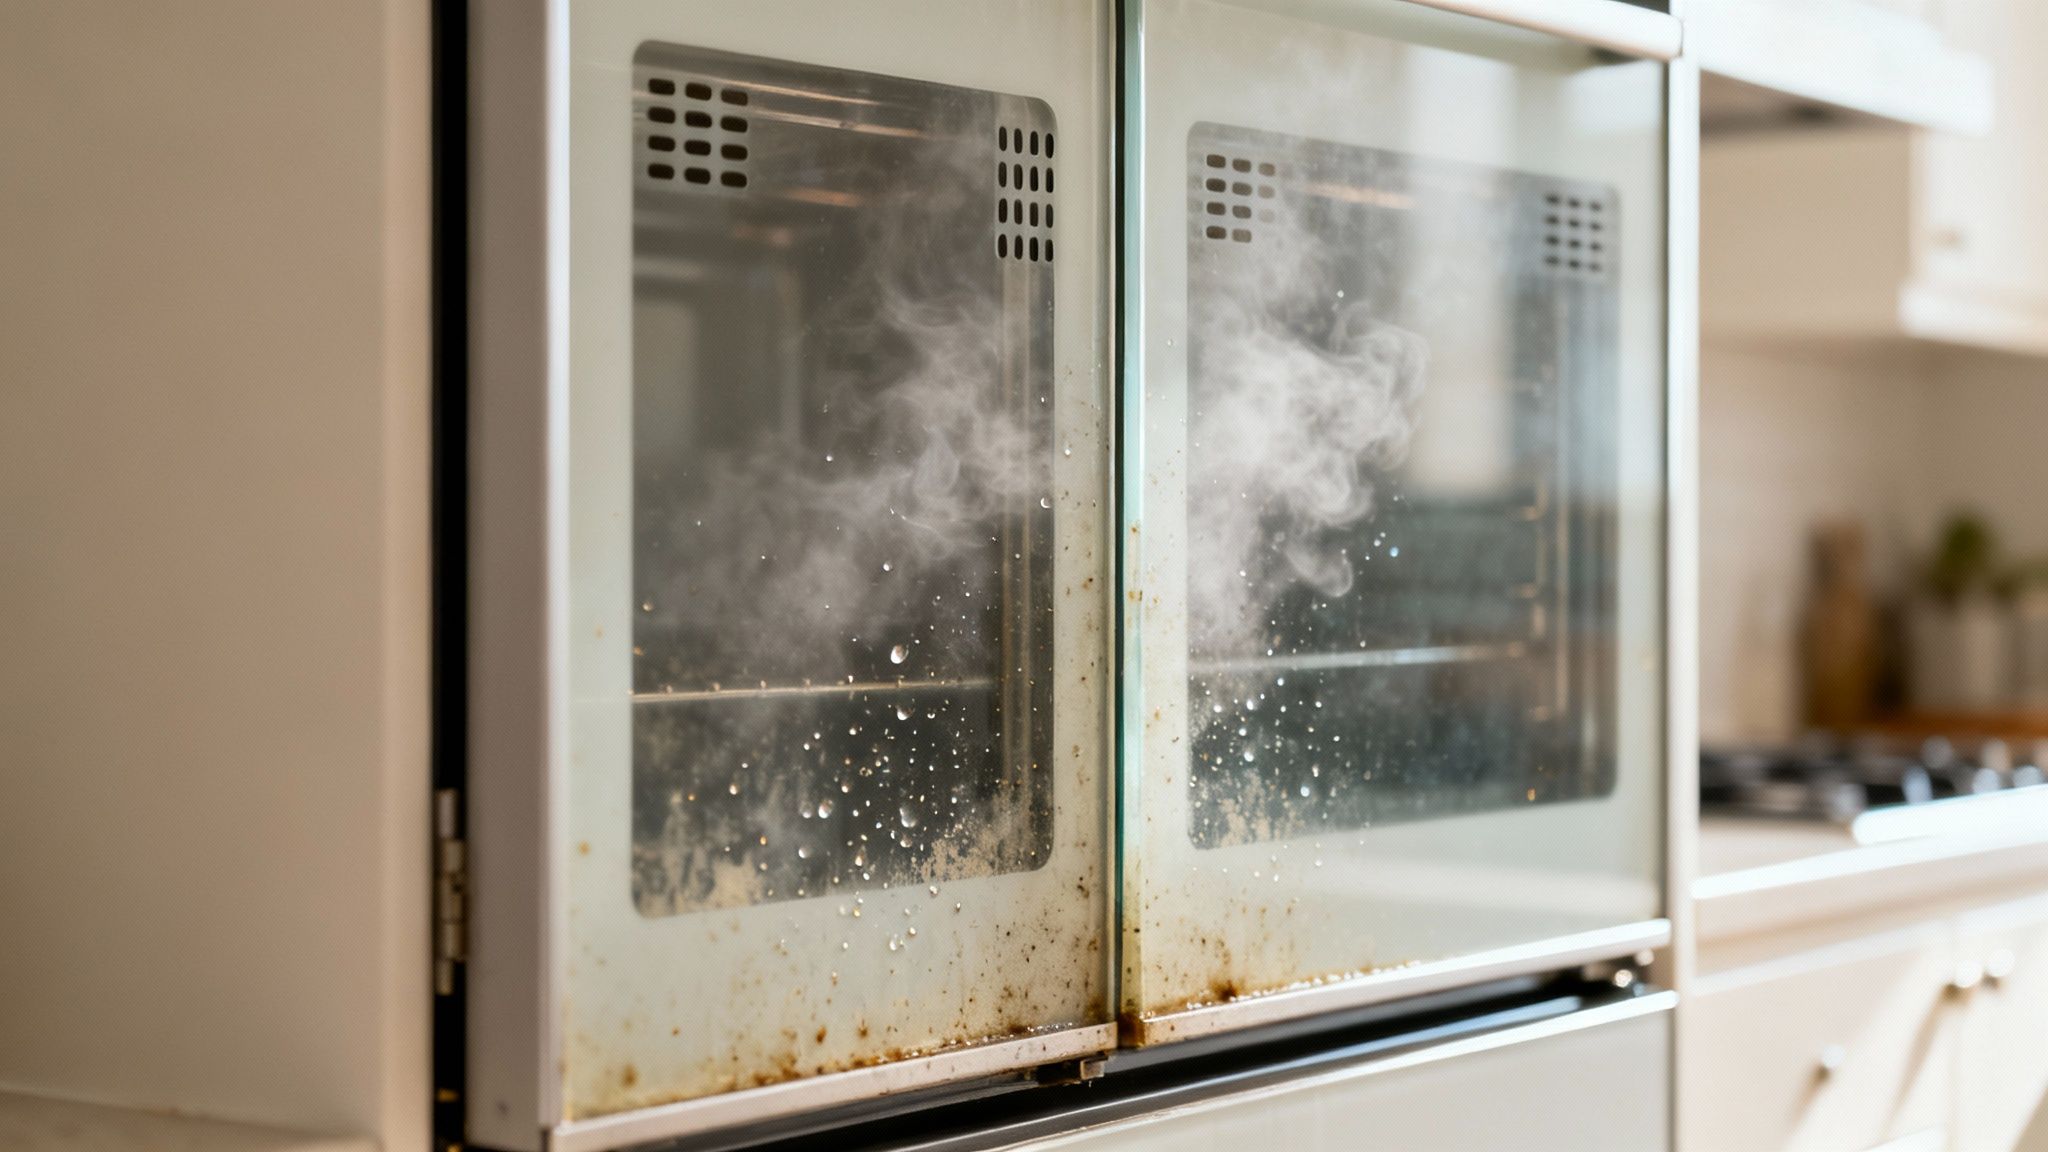
If you’ve ever stared at those frustrating streaks and thought you were doing something wrong, take a breath. You’re not alone. As your local cleaning neighbors, we see this issue in homes all across Madison, from Fitchburg to Verona. It isn’t a sign of poor cleaning- it’s actually a design feature working exactly as intended, just with a messy side effect.
Your oven door is built with small, often hidden, vents. These are essential for safety, allowing air to circulate between the inner and outer glass panels. This keeps the exterior of the door cool enough to touch- without them, it would become dangerously hot.
The Inevitable Buildup
The catch? Those same vents are the perfect entry point for grease, steam, and microscopic food particles. Every time you roast a chicken or bake a bubbling casserole, that moisture and grease become airborne. As the oven cools down, this grimy vapor is pulled into the space between the glass, where it condenses and sticks for good.
Here in Wisconsin, we really put our ovens to work during the cold winters, and that’s when this buildup can happen even faster. It’s a gradual process you might not notice at first, but over time, it creates that familiar cloudy film that blocks your view. For many, this is one of the biggest challenges of kitchen cleaning.
A consumer appliance survey found that about 38% of oven owners notice grime or condensation between their oven door glass within the first 3–5 years. This is especially common in areas with big temperature swings and heavy oven use.
Can the Self-Clean Cycle Help?
Unfortunately, the self-clean feature usually makes the problem worse. The intense heat of a self-clean cycle can bake the grease onto the inner glass, turning a light film into a stubborn, brown stain that’s nearly impossible to remove without taking the door apart.
Knowing how the grime gets there is the first step. Now, let’s talk about how to get it out.
Gathering Your Tools and Important Safety Checks
Before you even think about unscrewing your oven door, a little bit of prep work will make a world of difference. Having the right stuff ready not only makes cleaning between the oven glass easier but a whole lot safer, too. Think of it like getting your ingredients together before you start cooking- it just makes everything go smoother.
First things first: safety. This is the one part you absolutely cannot skip. Before you do anything else, you have to cut the power to your oven. Head over to your home's circuit breaker box and flip the switch that controls your oven. This simple step gets rid of any risk of electrical shock while you're working.
Your Oven Glass Cleaning Toolkit
You likely have most of what you need already. The good news is you don't need any harsh, specialized chemicals for this job. In fact, a gentler approach is always better for the glass and the delicate seals inside your oven door.
Before you start, it’s a good idea to gather everything in one place. Here’s a quick rundown of what will make the job go smoothly.
Item | Purpose | Why It Helps |
|---|---|---|
Phillips head screwdriver | Unscrewing the door panels | Most oven doors use standard screws to hold the glass in place. |
Old towel or blanket | Protecting your floor | Laying the heavy door on a soft surface prevents scratches. |
Small bowl or container | Holding screws | Keeps all the small parts in one spot so nothing gets lost. |
Microfiber cloths | Cleaning and polishing | You'll want at least two- one for scrubbing, one for a streak-free finish. |
Baking soda & water | Gentle cleaning paste | Creates a non-abrasive scrub that lifts tough, baked-on grease. |
White vinegar & water | All-purpose spray | A 50/50 mix in a spray bottle works great for general cleaning and rinsing. |
Putting everything on your towel before you begin means you won't have to get up and search for a tool mid-project.
For a fantastic all-purpose cleaner that’s both effective and safe for your home, you can also mix equal parts white vinegar and water in a spray bottle. If you're interested in making your cleaning routine a bit greener, we have a whole guide on eco-friendly house cleaning in Madison, WI you might find helpful.
Pro Tip: Take a moment to find your oven's user manual. A quick search online with your model number usually does the trick. Oven door designs can vary quite a bit, especially in newer homes around Madison and Verona, and the manual will show you exactly where the screws or clips are located. This little bit of research can save you a big headache.
How to Safely Access the Inner Oven Glass
Alright, this is the part that might feel a little intimidating, but I promise it’s more manageable than it looks. We're going to walk through how to get to that hidden grime, making this feel less like a major appliance repair and more like a satisfying weekend project.
The biggest hurdle for most folks is simply taking the oven door off. Once you’ve got the power cut and your tools ready, you’re prepared for the main event.
Getting the door off is usually a matter of opening it partway and flipping down small locking tabs on each hinge. These little levers are what keep the door from coming off during normal use. With those flipped, you can close the door slightly until it catches, then lift it straight up and away. It’s surprisingly simple on most models you'll find in homes across Fitchburg and Middleton.
Lay the door- outer side down- on the towel or blanket you prepared. It's heavier than you think, so be careful. Now, take a look at the inside-facing part of the door. You’re looking for a series of screws along the perimeter that hold the inner and outer panels together.
Finding and Removing the Screws
The number and location of screws can vary. Some oven doors have them along the top and bottom edges, while others might have them down the sides. This is where having your oven manual handy can be a real game-changer. Don't worry if you can't find it; just look carefully.
Once you've located them, use your Phillips head screwdriver to gently remove each one. As you take them out, place them immediately into your small bowl or container. Trust me, there's nothing more frustrating than a tiny screw rolling away under your cabinets. Keep everything in one spot.
It’s no surprise this is a common point of confusion. In fact, one analysis showed that about 27% of oven-related cleaning questions were specifically about how to clean between the glass, making it a top concern for homeowners. Keep in mind that many manufacturers advise against this process, as it can sometimes affect the door’s seal if not reassembled correctly, which you can learn more about by reviewing market insights on glass cleaner products and appliance care.
Before you begin, this simple flow illustrates the essential safety preparations.

These three steps- powering off, gathering tools, and protecting your floor- are the foundation for a safe and successful cleaning project.
Separating the Glass Panels
With all the screws removed, you should be able to carefully lift the inner panel off the door frame. It might be held in place with some small clips, so a gentle wiggle may be needed. Go slowly and don't force anything.
You’ll now have access to the inner glass surfaces that have been collecting that cloudy film. There are typically two or three panes of glass. Take note of how they are layered, paying attention to any spacers or seals between them. A quick photo with your phone can be a great reference for when it's time to put it all back together.
A Quick Word of CautionSome newer oven models, particularly those in downtown Madison apartments or new builds, may have sealed door units that are not designed to be taken apart. If you don't see any screws, it's best to stop and not try to pry the door open. Forcing it can break the door seals or crack the glass, leading to a much bigger problem.
Proven Techniques for a Streak-Free Finish
Okay, you've got the glass panels separated and laid out. Now for the satisfying part: the actual cleaning. The goal here is to get that glass sparkling without resorting to harsh chemicals that could damage the surface or leave fumes behind next time you bake.
Good news is, the best tools for the job are probably already in your kitchen.
Tackling Stubborn Grease with a Simple Paste
For those tough, brownish stains that have been baked on for who knows how long, a simple paste is your secret weapon. It’s gentle, surprisingly effective, and won’t scratch the glass.
The absolute best approach for that cooked-on grime is a non-abrasive paste you can whip up yourself.
Mix the Paste: Grab a small bowl and mix about half a cup of baking soda with a few tablespoons of water. You're looking for a thick, toothpaste-like consistency- something you can spread easily without it being runny.
Apply and Wait: Slather this paste all over the greasy spots on the glass panels. Don't be shy with it; a good, thick layer is what you want. Now, just let it sit for at least 15-20 minutes. This gives the baking soda time to work its magic and break down all that grease.
Wipe it Clean: Take a damp microfiber cloth and gently wipe the paste away. You’ll be amazed at how the grease lifts right off with it. If you have a few extra-stubborn spots, a non-scratch scrub sponge can help, but honestly, the paste usually handles all the heavy lifting.
This gentle approach is fantastic for other delicate surfaces, too. If you’re also dealing with a dirty stovetop, our guide on how to clean glass stove top burners like a pro uses similar principles to get a perfect finish without any scratches.
For Lighter Smudges and a Final Polish
If you’re just dealing with a light, hazy film instead of caked-on messes, you can skip the paste. A simple spray solution will get the job done in no time.
Just mix equal parts white vinegar and water in a spray bottle. Give the glass a light misting and let it sit for a minute or two. The vinegar is acidic enough to cut right through that light film and any hard water spots.
The real secret to a perfect, streak-free shine is all in the technique. Always wipe in one direction- either horizontally or vertically- not in circles. Then, grab a second, completely clean and dry microfiber cloth to buff the glass until it’s crystal clear.
This two-cloth method is a game-changer. It stops you from just pushing grime around and makes sure every last bit of residue is gone.
Finally, a quick word on what not to do. Stay far away from harsh chemical oven cleaners, abrasive powders, steel wool, or even the green scrubby side of a kitchen sponge. All of these can create tiny, permanent scratches in the glass. Sticking to these gentle, proven methods ensures your oven door will look brand new without any damage.
Putting Your Oven Door Back Together Correctly
With the glass sparkling clean, you're on the home stretch. Getting your oven door back together correctly is just as important as taking it apart. The good news is it's simply a matter of reversing the steps you just took.
The single most important tip here is to ensure every piece of glass is completely dry. Any trapped moisture will turn into condensation the next time you heat up the oven, leaving you with the same hazy view you just worked so hard to fix.
Securing the Glass Panels
Grab the glass panels and carefully place them back into the door frame in the same order you removed them. This is where that reference photo from earlier becomes a lifesaver, ensuring any spacers or seals end up exactly where they belong.
Once the glass is settled, you can start putting the screws back in.
Tighten the screws until they are snug, but be careful not to overtighten. Applying too much pressure can create stress points in the glass, leading to cracks when the oven heats up and cools down. A gentle, firm twist is all you need.
Re-Attaching the Door to the Oven
With the door fully reassembled, it’s time to put it back on the oven. This is another moment where having a helper can make things much easier, as the door is awkward and heavy.
Line up the hinge arms with the slots on the oven frame, sliding them in at the same angle you used to remove them. You should feel them slide securely into place.
Once the hinges are fully seated, open the door all the way and flip the small locking tabs back into their original position. This is a crucial step- it's what secures the door to the oven.
Give the door a few gentle opens and closes to make sure it moves smoothly and feels secure. Now, you can head back to the circuit breaker and restore power to your oven. A final check to ensure it turns on and the door seals properly is the perfect finish to a job well done.
When It’s Time to Call for Oven Cleaning in Madison
Sometimes, a DIY project just isn't worth the hassle. If you've tried everything and that baked-on grime refuses to budge, or you discover your oven door is a sealed unit with no visible screws, it’s a good sign to call for backup. Forcing a sealed door can easily break the glass or damage the seals, leading to a much more expensive repair down the road.
This is especially true when you're dealing with that tricky space between the oven door glass. While the global market for oven cleaners is huge, almost all of them are designed for surfaces you can actually reach. Industry insights show that once grease and grime get trapped between sealed glass panes, no off-the-shelf cleaner can get to it. You can see more on these oven cleaner market trends if you're curious.
Don't risk damaging your appliance. If you're feeling unsure about taking your oven door apart or the job just feels too big, it’s always smarter- and safer- to let a professional handle it.
Our team at Shiny Go Clean is here to help. We provide expert oven cleaning in Madison and the surrounding areas, from Fitchburg to Middleton. We have the right tools and the experience to tackle this job safely, saving you a lot of time and potential stress.
Think of us as your friendly neighbor who just happens to be a cleaning pro. We make getting a quote for oven cleaning Madison fast and easy so you can get back to your day.
Give us a call at (608) 292-6848 or send a quick email to madison@shinygoclean.com for a friendly, no-fuss quote.
Common Questions About Cleaning Oven Glass
We get a lot of questions from Madison residents about this specific cleaning job. It can feel a little tricky, so here are some quick answers to the things we hear most often. Hopefully, these tips will give you a bit more confidence to tackle the project yourself.
Can I Use a Coat Hanger to Clean Between the Glass?
We’ve seen this hack floating around online, but we strongly advise against it. When you push a cloth-wrapped hanger into the vents, you’re risking some serious scratches on the glass or damage to the delicate seals.
Even worse, the cloth can get snagged and permanently stuck inside. The only truly safe way to get between the glass is to actually take the door apart.
How Can I Prevent Grime from Building Up Again?
A little prevention goes a long way here. After your oven has cooled down, try to make a habit of wiping up any splatters or spills you see on the inside of the door.
Also, be mindful of cooking with a lot of excess moisture. Steam is the main culprit that carries tiny grease particles up into those door vents in the first place.
My Oven Door Seems to Be a Sealed Unit. What Now?
You're right- many modern ovens have doors that aren't designed for homeowners to disassemble. This is especially true in newer homes and apartments around Madison. If you can't find any screws or obvious access points, it’s almost certainly a sealed unit.
Forcing it open will likely break it for good. In this case, your only safe option is to call in a professional service like ours for help.
That stubborn film of grime between the glass can be a real headache. If the job feels too complicated or you’d rather not risk damaging your oven, just let Shiny Go Clean handle it.
Our team has the right tools and experience for expert oven cleaning in Madison. Call us at (608) 292-6848 or visit us online to get a quick quote and reclaim your weekend.