Your Ultimate 10-Point Move In Clean Checklist for a Fresh Start in Madison
- Dec 13, 2025
- 18 min read
Welcome to Madison! Moving into a new home is one of life's most exciting moments. Before you start arranging furniture and hanging pictures, however, there's one essential step that sets the stage for a healthy, happy beginning: a thorough move-in clean. You simply don't know what's been left behind, from the grime hidden inside kitchen cabinets to the dust that settled after the last residents moved their belongings out.
This isn't just about appearances-it's about creating a safe and sanitary environment for your family from day one. Think about the allergens lurking in carpets, the buildup in hard-to-reach corners, or the remnants of a chilly Madison winter tracked across the floors. A deep clean removes the final traces of the previous occupants and ensures your new space is truly your own.
This comprehensive move in clean checklist is designed to guide you through the process efficiently, ensuring no surface is overlooked. We'll break it down so you can transform your new house or apartment into a home. Whether you're a new homeowner in Fitchburg or moving into a downtown Madison apartment near the lake, following this guide will give you the confidence that your new chapter is starting on the freshest, cleanest note possible. Let’s get your new space sparkling so you can unpack and settle in with complete peace of mind.
1. Deep Clean Walls and Remove Marks
Before you even think about unpacking boxes, look at the walls. They are the largest surface in any room and often get overlooked, but they can hold onto dust, allergens, and grime from previous occupants. A thorough wall cleaning is a foundational step in any serious move in clean checklist, creating a genuinely fresh canvas for your new home. This isn't just a quick wipe-down; it involves tackling everything from scuff marks in the hallway to greasy fingerprints near light switches.
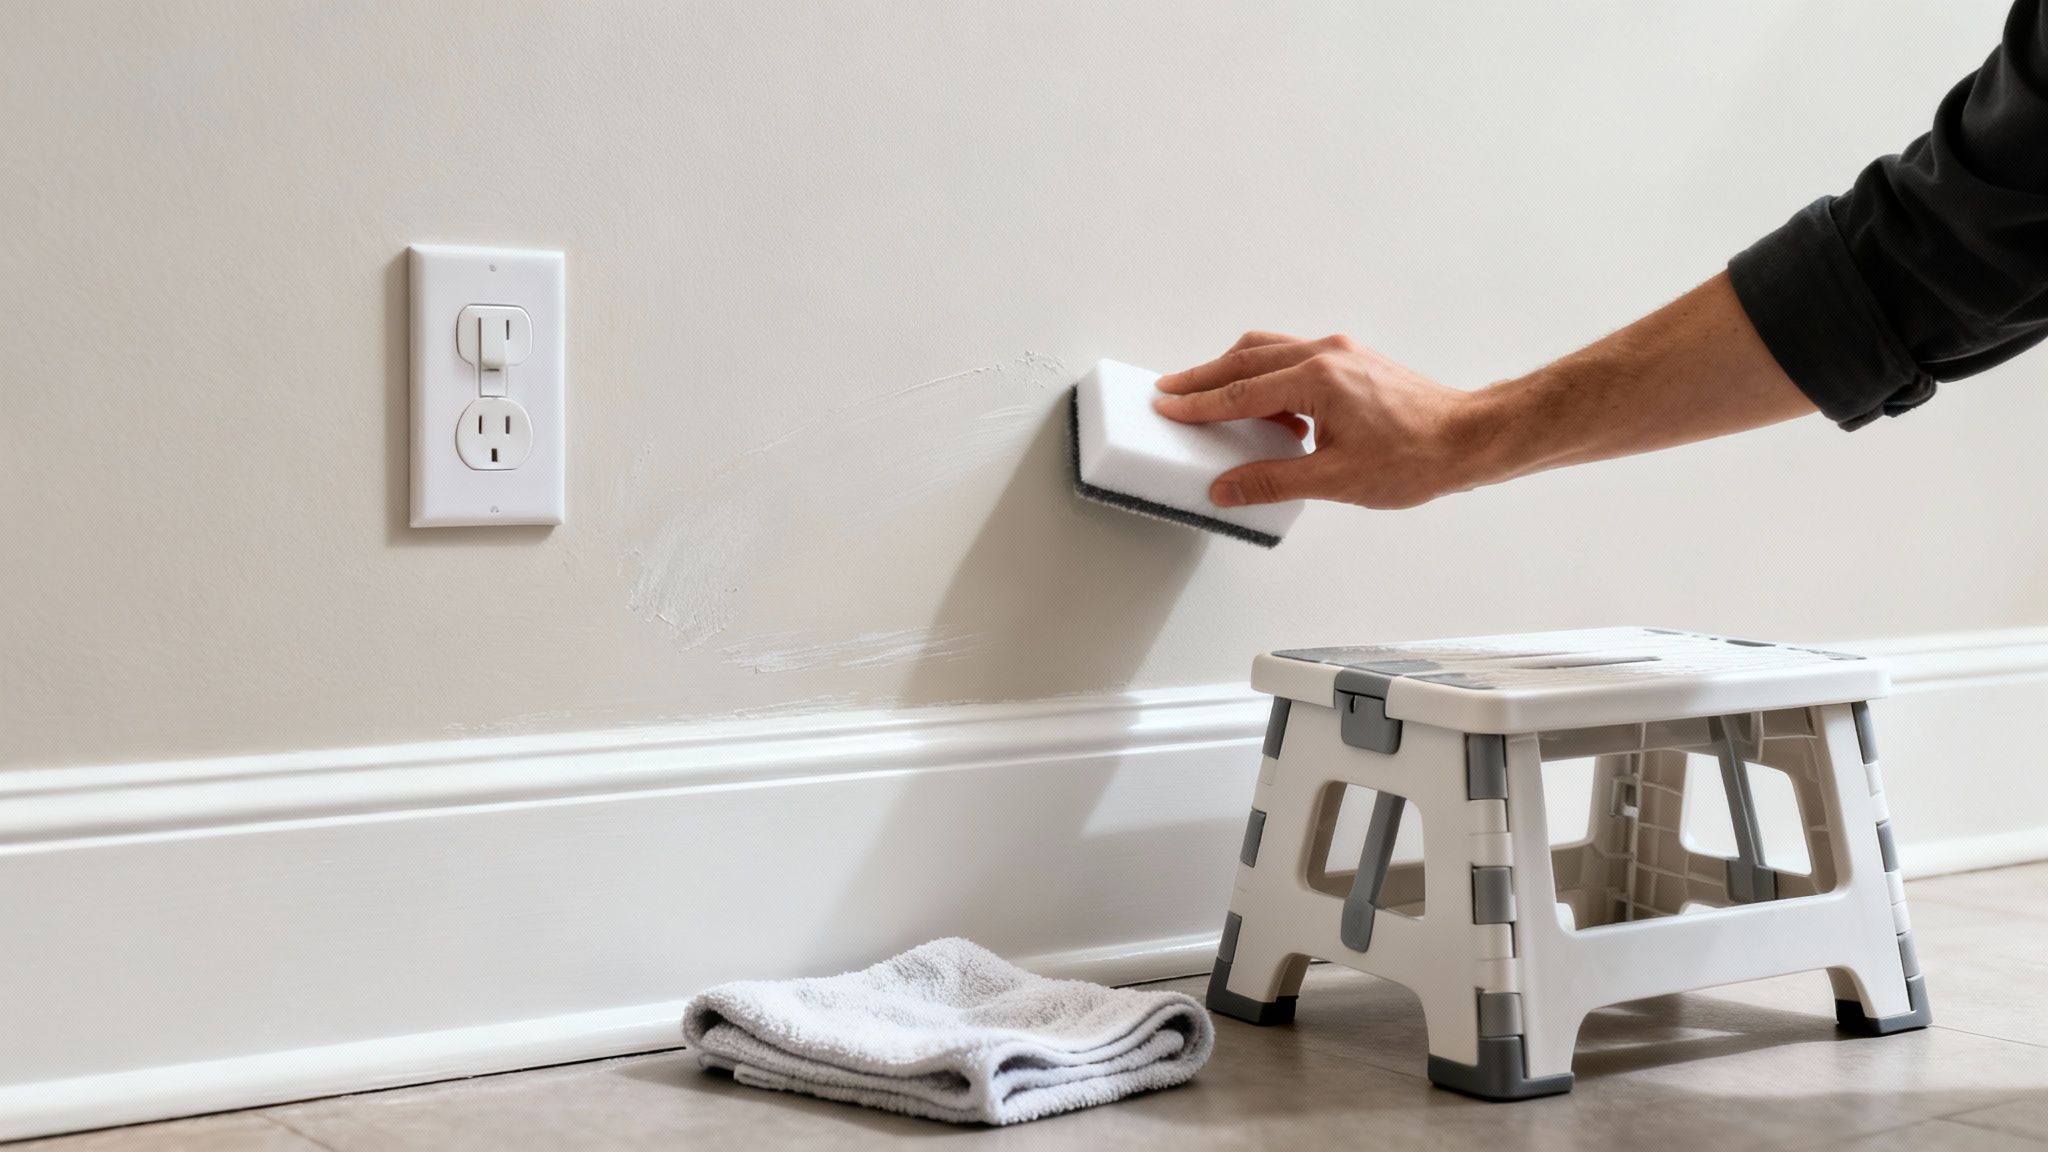
Starting with a clean slate means you won't be breathing in lingering dust or staring at someone else's scuffs for the next few years. In Madison, where older homes have character-and often plaster or textured walls-this step is crucial for making the space feel truly yours. Tackling this first prevents dust and debris from falling onto freshly cleaned floors later.
How to Get Your Walls Sparkling
Here’s a practical approach to ensure your walls are spotless:
Start High, Go Low: Always begin cleaning at the top of the wall and work your way down. Gravity will pull dust and drips downward, so this method prevents you from having to re-clean lower sections. Don’t forget the corners where cobwebs love to hide.
Match the Cleaner to the Paint: Not all walls are the same. For glossy or semi-gloss paints (common in kitchens and bathrooms), a gentle degreasing solution works wonders. For delicate matte or flat paints, use a barely damp microfiber cloth or a dry sponge to avoid causing damage.
Test a Hidden Spot: Before applying any cleaner to a large area, test it on an inconspicuous spot-like behind a door or inside a closet-to ensure it doesn't discolor the paint.
Erase, Don't Scrub: For stubborn scuff marks, a melamine foam sponge (like a Mr. Clean Magic Eraser) is your best friend. Use a light touch to gently lift the mark without damaging the paint.
Cleaning unique surfaces, like the textured walls found in many Madison homes, requires a special technique. To get it right, check out our expert advice on how to clean textured walls in Madison without causing damage.
2. Kitchen Deep Clean and Degreasing
The kitchen is the heart of the home, but it can also be the biggest source of hidden grime from previous tenants. Tackling the kitchen early in your move in clean checklist is essential for food safety and peace of mind. This isn't just about wiping down counters; it's a full-scale assault on the grease, food splatters, and sticky residues that build up on every surface, from the range hood to the inside of the oven.
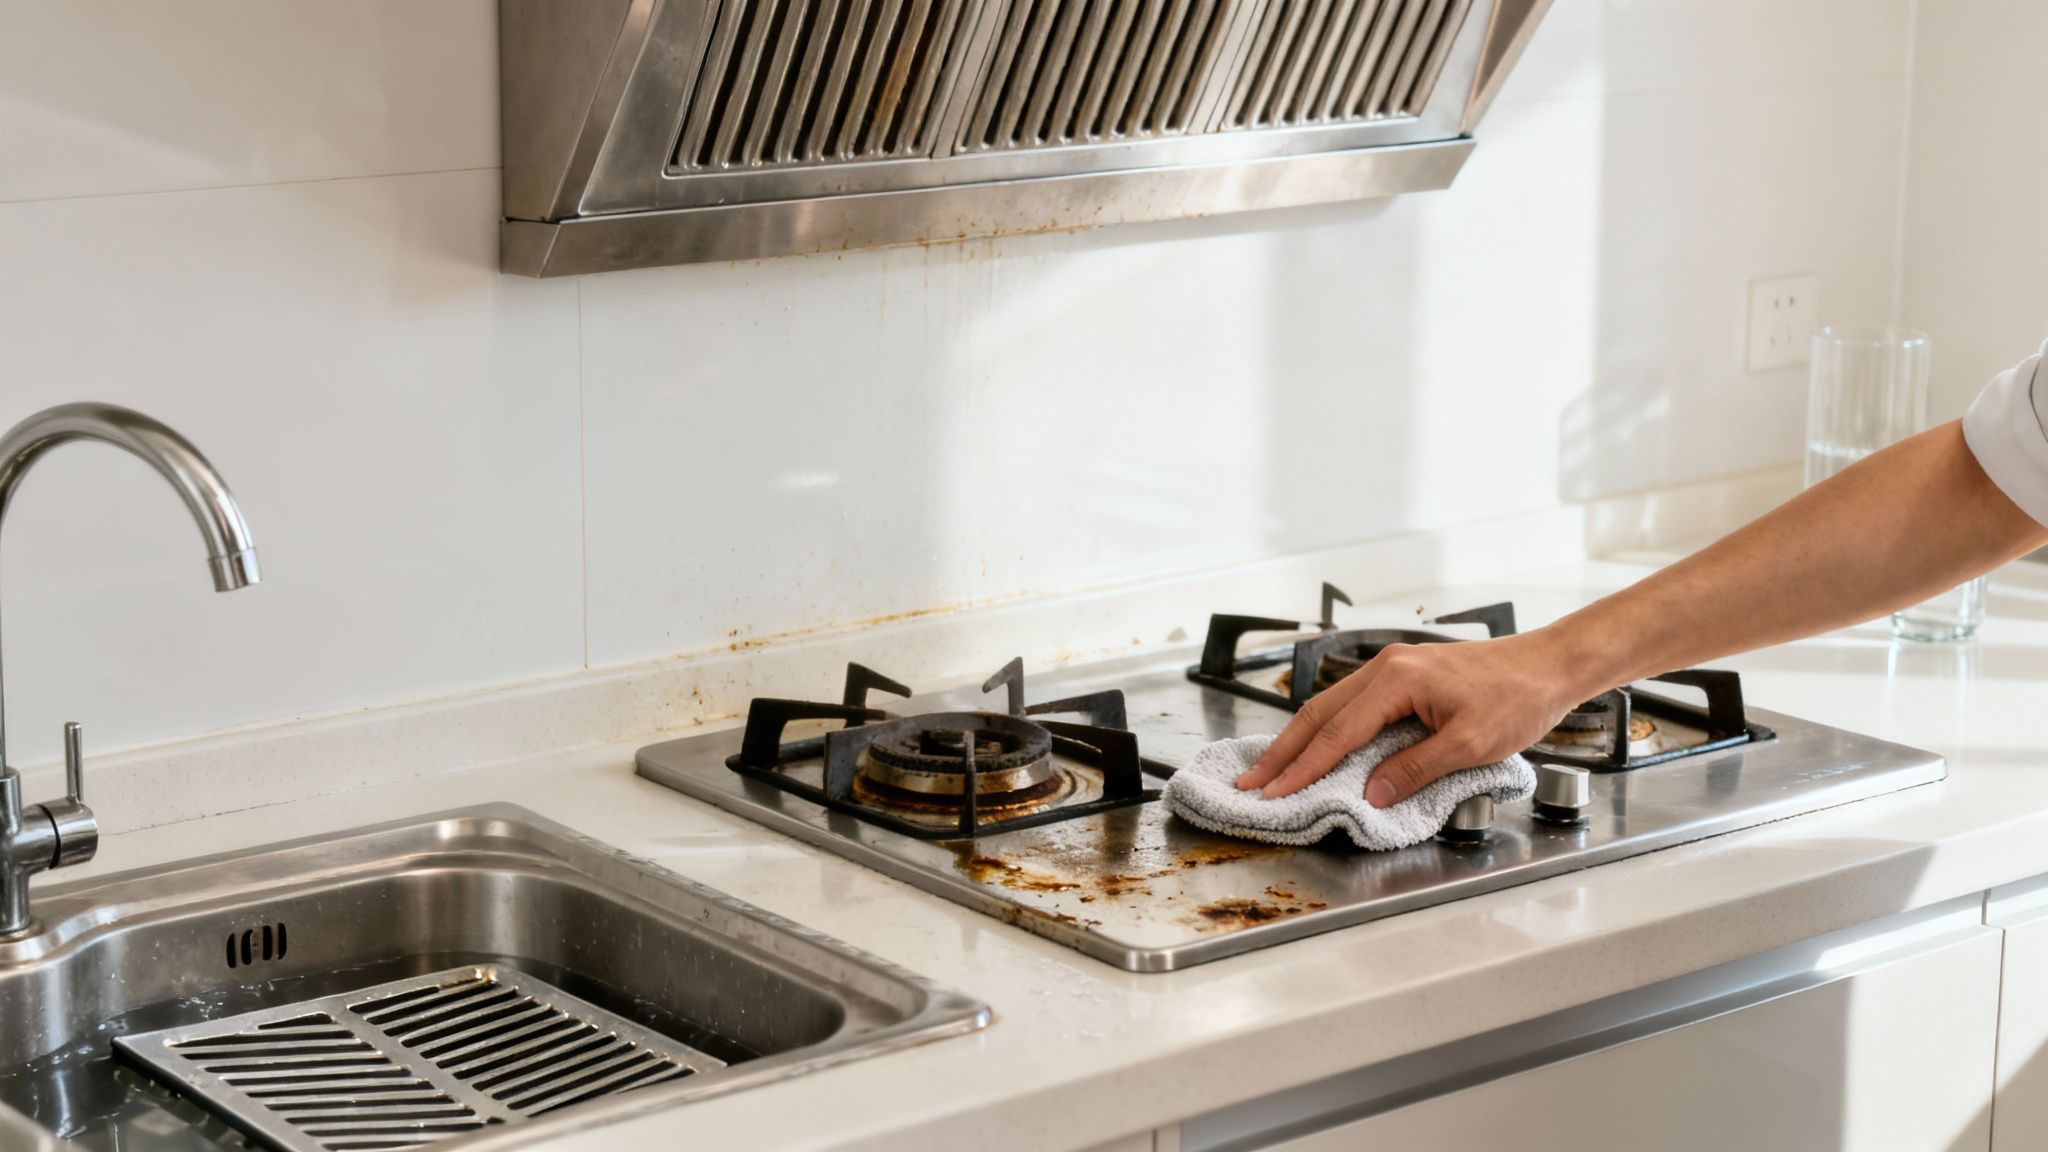
Starting with a sanitary kitchen ensures your first meal in your new home is prepared in a truly clean environment. In Madison, where you might be moving into anything from a downtown apartment to a family home in Fitchburg, you never know what the last occupant left behind. A deep degreasing eliminates old food smells and bacteria, making the space feel safe and new before you stock the pantry.
How to Degrease Your Kitchen
Here’s a step-by-step guide to get your new kitchen ready for use:
Soak and Soften: For tough, baked-on grease on stovetops and range hood filters, apply a quality degreaser and let it sit for 10-15 minutes. This gives the solution time to break down the grime, making scrubbing much easier.
Appliance Insides Matter: Don't just clean what you can see. Pull out the refrigerator to clean the coils for better efficiency, scrub the inside of the microwave, and run a cleaning cycle on the dishwasher. A deep oven cleaning in Madison is a must-do to remove burnt-on food.
Cabinet Fronts and Handles: Wipe down all cabinet exteriors and handles with a degreasing cleaner. These high-touch areas accumulate an astonishing amount of grease and fingerprints over time.
Stainless Steel Savvy: Use a dedicated stainless steel cleaner and a microfiber cloth to wipe down appliances. Always wipe in the direction of the grain to prevent streaks and achieve a polished, fingerprint-free shine.
For a visual guide on tackling one of the kitchen's toughest jobs, watch this video on deep cleaning a greasy stovetop.
3. Bathroom Sanitization and Disinfection
Of all the rooms in a new house, the bathroom is where a deep, sanitizing clean is absolutely non-negotiable. This space is a prime area for bacteria, mold, and germs left behind by previous occupants. A thorough disinfection is a critical part of any move in clean checklist, ensuring the most personal space in your home is hygienic and safe for your family from day one. This goes beyond a simple wipe-down; it means sanitizing every surface, from the toilet base to the showerhead.
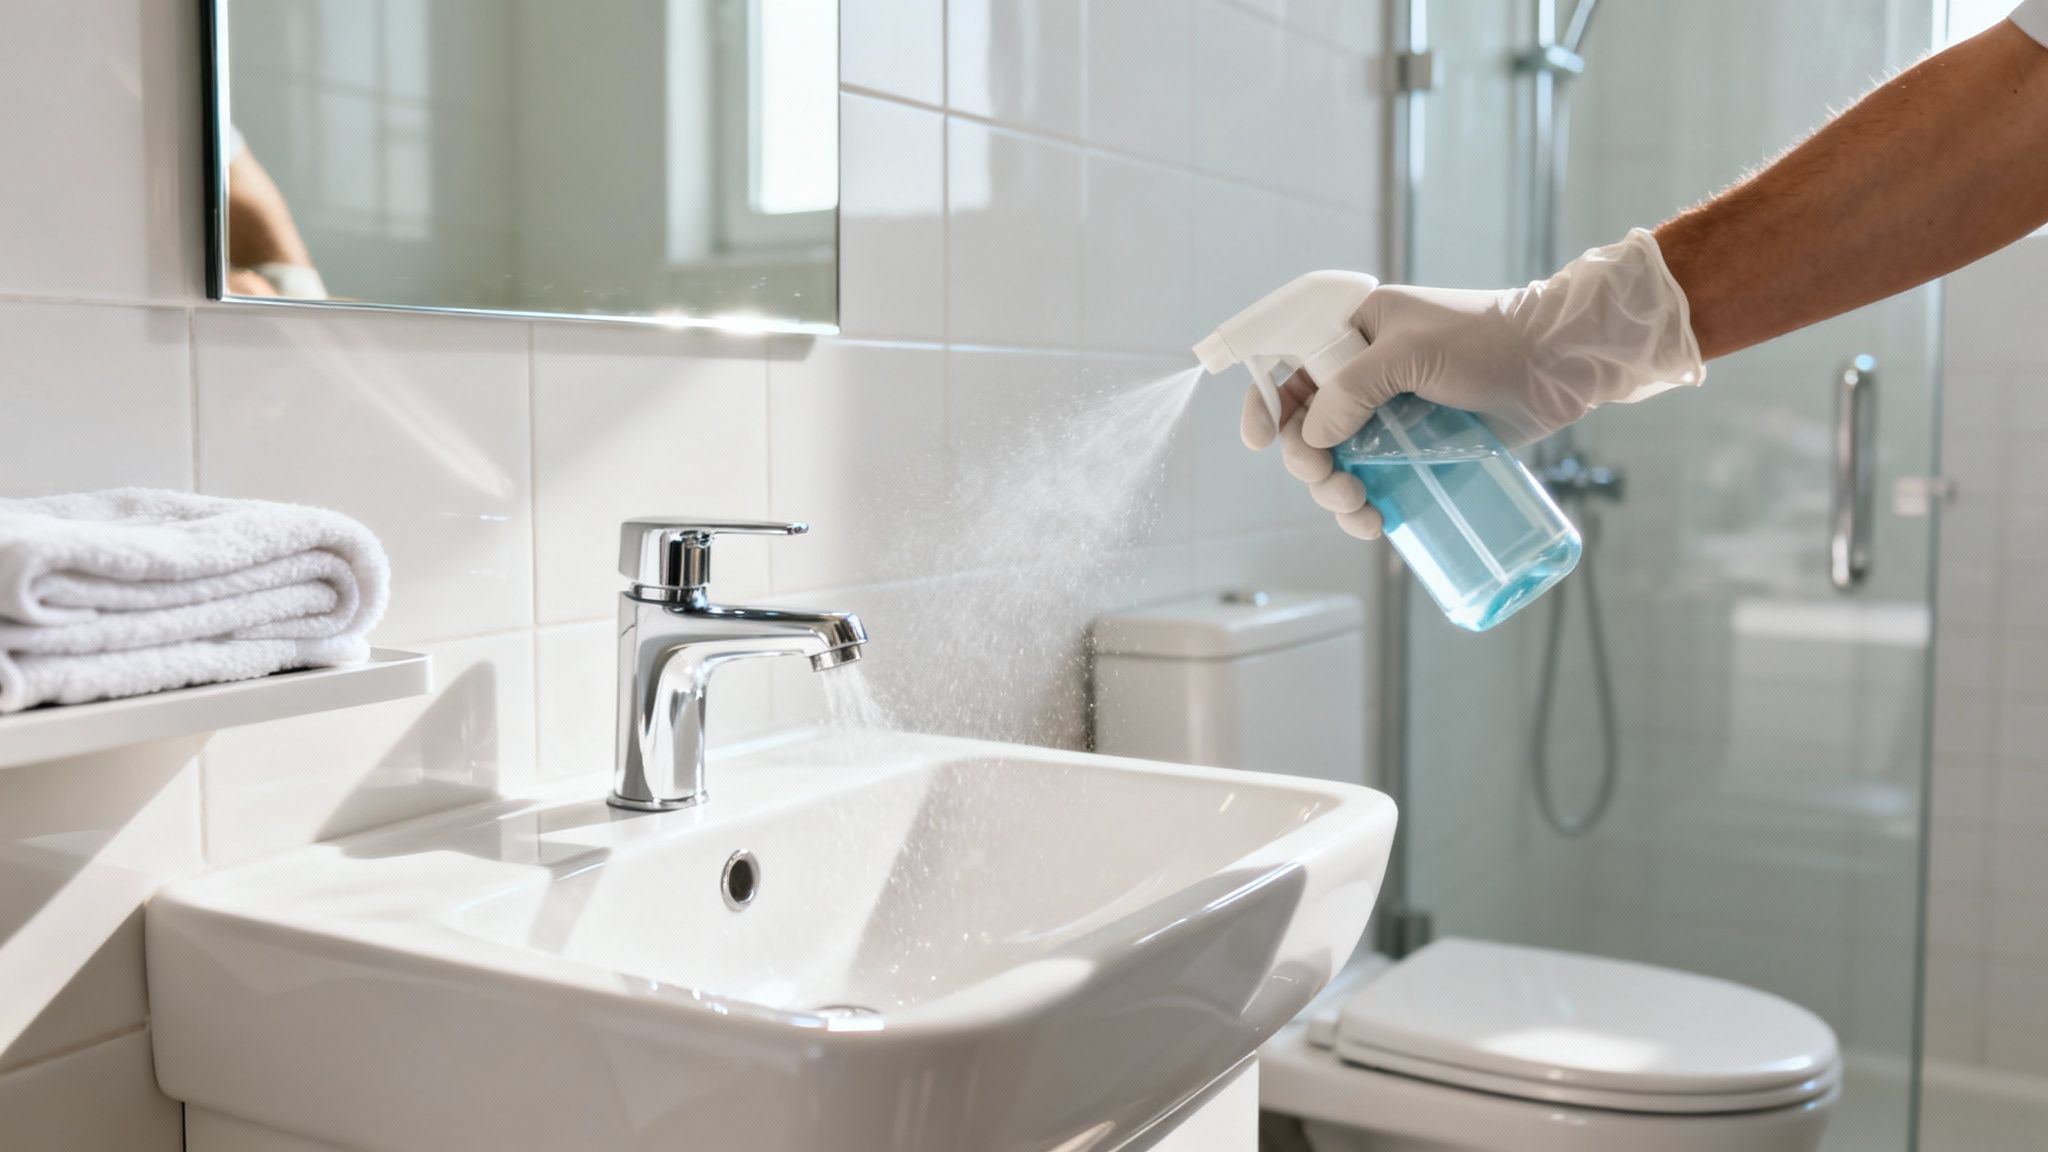
Starting with a properly sanitized bathroom provides immediate peace of mind. In Madison homes, where moisture can be an issue, especially during humid summers, this step helps prevent future mold and mildew growth. Addressing the bathroom early ensures you can feel comfortable using it right away without worrying about hidden grime or lingering germs.
How to Achieve a Pro-Level Sanitized Bathroom
Here’s a practical guide to disinfecting every corner of your new bathroom:
Prioritize High-Touch Surfaces: Begin by disinfecting the areas that are touched most frequently: light switches, doorknobs, faucets, and the toilet handle. Use a powerful disinfectant spray like Lysol or a bleach-based solution.
Let Disinfectants Dwell: For maximum effectiveness, cleaning agents need time to work. After spraying a surface like the countertop, shower, or inside the toilet bowl, let the product sit for the manufacturer's recommended contact time-usually 5-10 minutes-before wiping or scrubbing. This is crucial for killing germs.
Don't Forget the Details: Use a grout brush to scrub tile grout lines, which can harbor mold. Clean out the exhaust fan vent to improve air circulation and prevent moisture buildup. Use a dedicated toilet bowl cleaner and a sturdy brush to sanitize inside the toilet thoroughly.
Safety First: Always wear gloves when working with strong chemicals like bleach. Ensure the bathroom is well-ventilated by opening a window or running the exhaust fan to avoid inhaling fumes.
Making a bathroom sparkle takes effort, but the results are well worth it. For a complete guide to achieving that professional gleam, check out our expert tips on how to clean a bathroom for a pro-level shine in Madison.
4. Floor Cleaning and Preparation
After the walls are clean, your attention should move downward to the floors. This is a critical part of any move in clean checklist because floors harbor everything from tracked-in dirt and allergens to residues left by previous occupants. A deep floor cleaning isn't just about appearances; it's about removing unseen grime and creating a truly clean and safe surface for your family, pets, and furniture. Tackling this before anything is moved in is the most efficient way to ensure every square inch is sanitized.
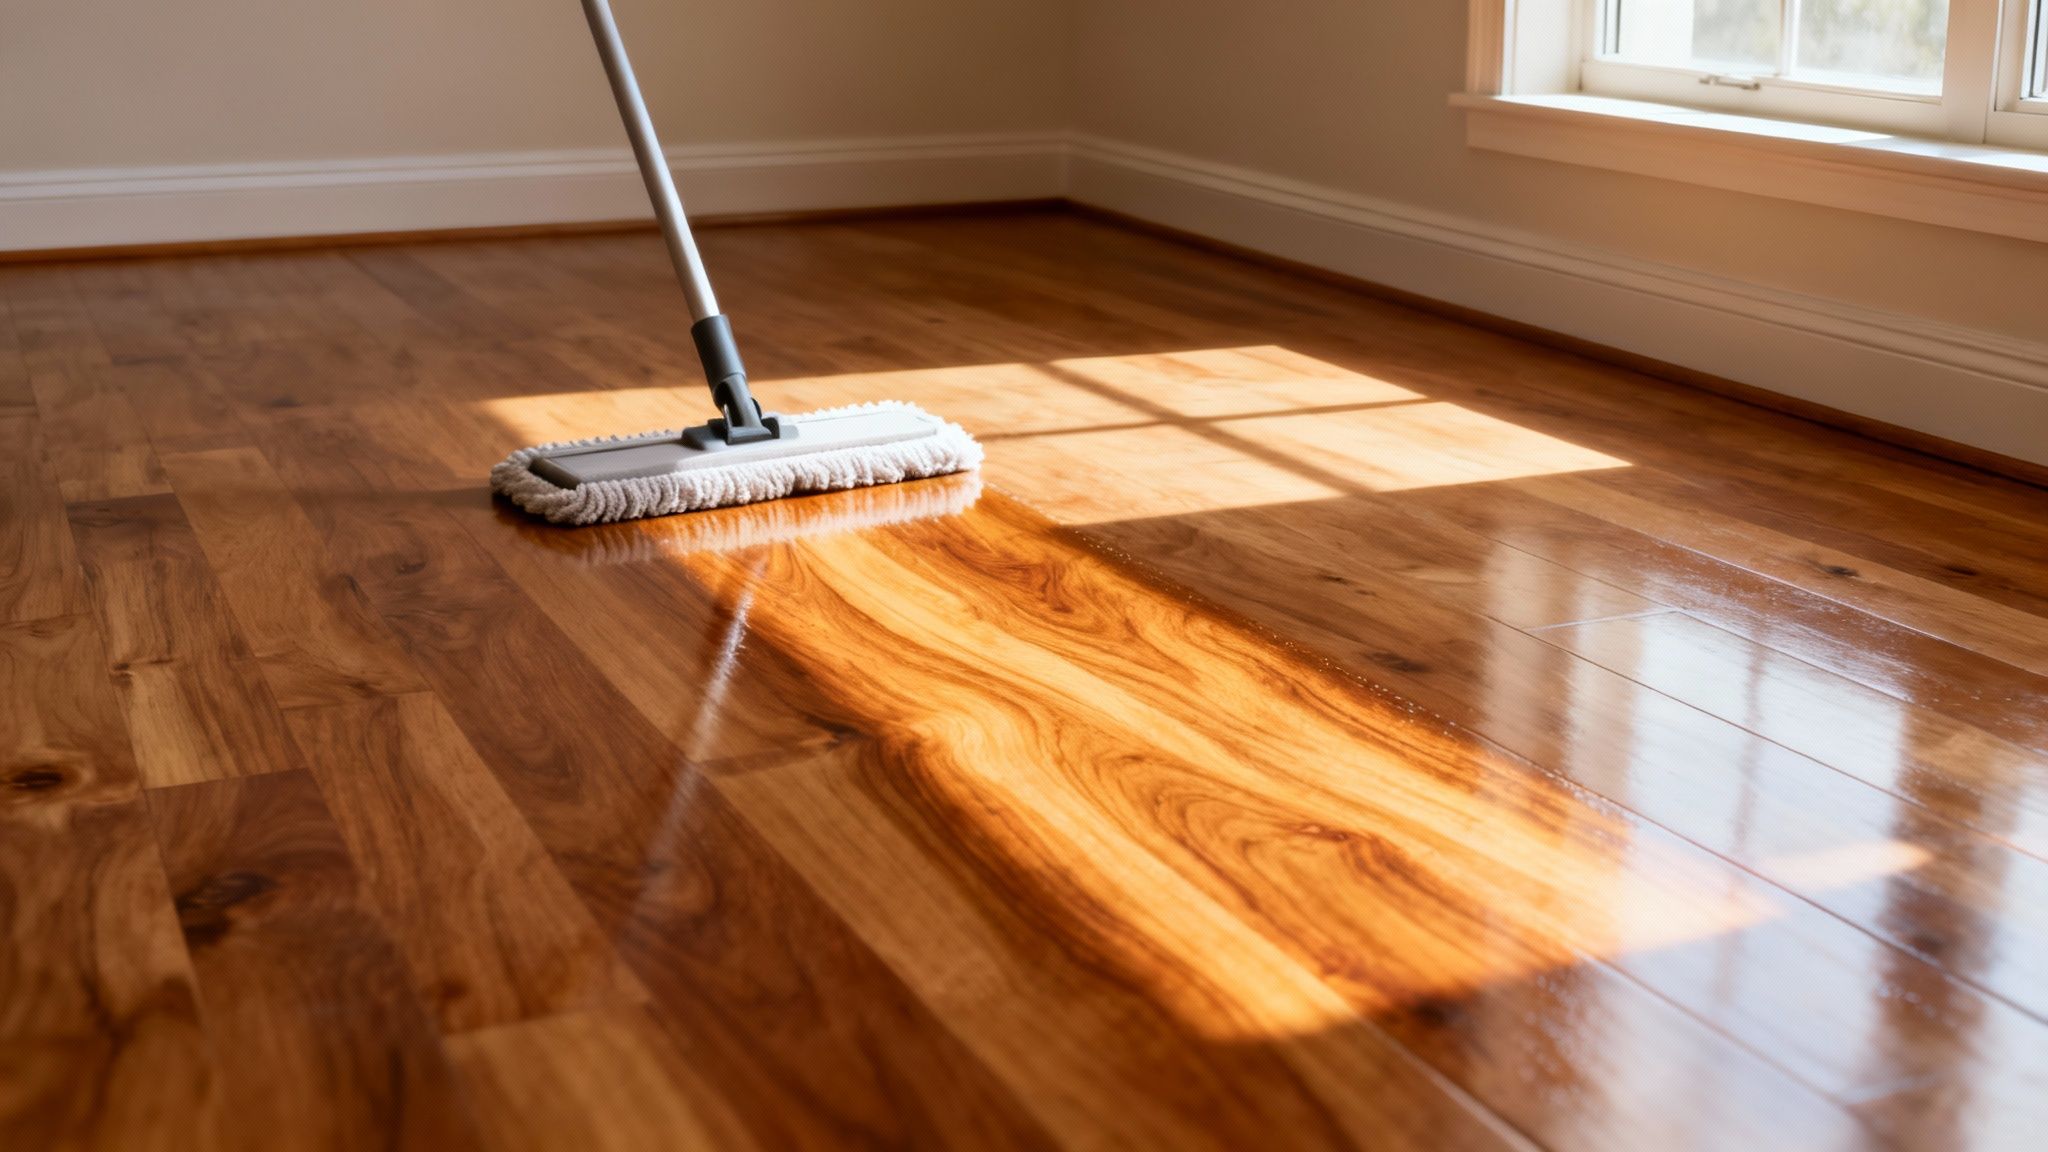
Starting with immaculate floors means you won't be kicking up dust from the last tenants when you unpack or worrying about what’s lurking in the carpet fibers. In Madison, where we see everything from slushy winter boots to dusty summer sandals, floors take a beating. A proper deep clean removes this history and prepares the foundation of your home for a fresh start, preventing dirt from being ground into surfaces by heavy furniture.
How to Prepare Your Floors for Move-In
A systematic approach ensures no corner is missed and every floor type gets the right treatment:
Vacuum First, Always: Before any water or cleaning solution touches the floor, do a thorough vacuuming. This removes all loose debris-dirt, dust, pet hair-so you aren't just pushing it around with a mop.
Use the Right Cleaner: Hardwood floors need a pH-neutral cleaner to prevent damage to the finish. For tile, you can use a stronger degreasing solution, and for laminate, a specialized laminate cleaner is best. Always test your chosen solution on a small, hidden area first.
Rent a Professional Carpet Cleaner: For carpeted rooms, a standard vacuum won't cut it. Renting a professional-grade steam cleaner will extract deep-seated dirt, allergens, and odors, making a world of difference for your air quality.
Mop Smart, Not Hard: Use a microfiber mop pad, which is excellent at trapping dirt and preventing streaks on hard surfaces. Work from the farthest corner of the room back toward the exit so you don't walk over your clean floors.
Allow for Drying Time: One of the biggest mistakes is moving furniture onto damp floors. This can trap moisture, leading to mildew or damaging the floor's finish. Give them ample time to air dry completely.
5. Window and Glass Cleaning
After the walls are clean, your next focus should be on what you see through them. Windows, mirrors, and glass doors are magnets for dust, fingerprints, and grime, which can make an otherwise clean home feel dingy and dark. A proper window cleaning is a critical part of any move in clean checklist because it immediately brightens the entire space, letting in maximum natural light and offering crystal-clear views of your new neighborhood. It's about more than just aesthetics; it's about making your home feel open, airy, and welcoming from day one.
Letting the Madison sunshine pour in can completely transform the feel of a room, but not if it’s filtered through layers of dust and smudges left behind by previous tenants. Cleaning all glass surfaces removes this film and ensures you're not inheriting someone else's grime. This step is best done after the walls are clean but before the floors, as drips and dust from window tracks can fall downward.
How to Get Your Glass Gleaming
Here’s a practical guide to achieving a professional, streak-free shine:
Choose an Overcast Day: Direct sunlight can cause your cleaning solution to evaporate too quickly, leaving behind stubborn streaks and spots. Cleaning on a cloudy day gives you more time to work and wipe away the solution properly.
Master the Squeegee: For a truly professional, streak-free finish on windows and large mirrors, nothing beats a squeegee. Overlap each stroke by about an inch and wipe the blade clean with a microfiber cloth after each pass.
Don't Forget the Details: Use a small brush or a vacuum crevice tool to clear dust, dirt, and dead bugs from window tracks and sills before you start spraying any liquid. Wipe the frames down afterward to prevent water spots.
Mix a Simple, Effective Solution: A simple 1:1 mixture of white vinegar and water is a powerful, non-toxic cleaner that cuts through grime and film. For a completely spotless result, use distilled water to avoid mineral deposits.
Getting that perfect, invisible-glass look can be tricky, especially with the hard water we often see in Madison. For more insider techniques, discover our professional tips on how to clean windows without streaks in Madison.
6. Ceiling and Light Fixture Cleaning
Before you start on the walls or floors, your first move should be to look up. Ceilings, ceiling fans, and light fixtures are notorious dust magnets that often go completely unnoticed. Addressing these high-up areas is a critical first step in your move in clean checklist, ensuring that old dust, cobwebs, and allergens don't rain down on your freshly cleaned surfaces later. This task sets the stage for a truly top-to-bottom clean.
Starting with a clean overhead space improves air quality and brightens the entire room, making your new home feel more open and welcoming. In many Madison homes, especially older ones with unique architectural details or newer builds with recessed lighting, dust can settle in hard-to-reach places. Cleaning these first is a non-negotiable step for a methodical and effective deep clean.
How to Tackle Ceilings and Fixtures
Here’s a safe and effective way to get your overhead spaces pristine:
Cover and Prepare: Before you start, lay a drop cloth or old sheet on the floor and over any furniture. This will catch all the falling dust and debris, saving you a major cleanup headache later on.
Use the Right Tools: An extendable microfiber duster is perfect for reaching high corners and flat ceiling surfaces without needing a ladder. For ceiling fan blades, an old pillowcase works wonders-just slide it over each blade and wipe, trapping the dust inside.
Wipe Down Fixtures: For light fixtures and fan housings, turn off the power at the circuit breaker first. Use a slightly damp microfiber cloth to gently wipe down all surfaces. This is also the perfect time to replace any old or burnt-out light bulbs.
Prioritize Safety: Always use a sturdy step stool instead of an unsteady chair for better stability. For your health, wear a dust mask to avoid inhaling the airborne particles you dislodge, especially if you're sensitive to allergens.
7. Closet and Storage Area Cleaning
It’s easy to overlook closets and cabinets, but these enclosed spaces are magnets for dust, musty odors, and even pests left behind by previous occupants. A detailed cleaning of all storage areas is a non-negotiable part of a thorough move in clean checklist, ensuring your clothes, linens, and pantry items have a truly fresh, sanitary home from day one. This goes beyond a quick wipe; it's about resetting every shelf, rod, and drawer.
Starting with pristine storage prevents you from placing your belongings into a dusty or grimy environment. In many Madison homes, especially older ones with built-in cabinetry, these spaces can hold years of accumulated debris. Addressing them before you unpack means you won't have to empty everything out again later to deal with a lingering smell or hidden grime.
How to Get Your Storage Areas Spotless
Here’s a practical approach to ensure your closets and cabinets are move-in ready:
Empty and Disassemble: If possible, remove any adjustable shelves or drawers. This allows you to clean every surface thoroughly-including the undersides, brackets, and interior walls of the cabinet or closet itself.
Use a Damp Cloth, Not a Spray: To control moisture in enclosed spaces and prevent potential damage, avoid spraying cleaners directly onto surfaces. Instead, lightly dampen a microfiber cloth with your cleaning solution and wipe everything down.
Don't Forget the Details: Wipe down closet rods, door interiors, hinges, and hardware. These small details are often missed but can hold a surprising amount of dust and fingerprints. Look for and address any signs of pests or mold immediately.
Line for Protection: Once everything is completely dry, consider adding shelf liners. This not only protects the surfaces from scratches and spills but also makes future cleaning much easier.
8. Door, Frame, and Hardware Sanitization
Doors and their hardware are some of the most frequently touched surfaces in any home, yet they are often completely missed in a standard cleaning routine. Think about every hand that has turned that knob or pushed that door open. Thoroughly cleaning and sanitizing doors, frames, and handles is a non-negotiable part of a comprehensive move in clean checklist, effectively removing germs, bacteria, and grime left behind. This step is about more than just appearances; it's a crucial measure for health and hygiene.
Starting your new life in a home means ensuring every high-touch point is disinfected. From the front door lock to the pantry handle, these surfaces can harbor invisible germs. In Madison, where seasonal colds and flu are a reality, taking the time to sanitize these areas provides peace of mind and a truly healthy start. Addressing this before you move furniture in ensures you can access all sides of every door without obstruction.
How to Properly Clean and Sanitize Doors
Here’s a systematic approach to making sure every door and its components are clean and hygienic:
Wipe Down the Entire Surface: Begin by wiping down the entire door, on both sides, with a microfiber cloth and an appropriate cleaner for the material (wood, laminate, or metal). This removes the top layer of dust and dirt.
Focus on High-Touch Hardware: Use a quality disinfectant wipe or spray on all door handles, knobs, locks, and even hinges. Pay close attention to the areas where fingers naturally rest.
Don't Forget the Frames: Door frames, especially the top ledge, are notorious for collecting dust. Wipe them down from top to bottom, including the small crevices where grime can build up.
Lubricate for Smooth Operation: After cleaning, check if hinges squeak or locks stick. A light application of a lubricant like WD-40 can make them work smoothly, preventing future frustration.
This detailed attention to sanitization is a hallmark of a professional-level clean. If you're managing a busy move in Madison, especially in a larger home, getting this deep clean done right can be overwhelming. Let our maid service in Madison WI handle every last detail, including every doorknob, for you.
9. Interior Air Quality and Odor Removal
Once the visible grime is gone, it’s time to address the invisible-the air you’ll be breathing every day. Previous occupants can leave behind lingering odors from pets, cooking, or smoke that cleaning surfaces alone won't eliminate. Tackling interior air quality is a critical, often forgotten, item on a comprehensive move in clean checklist, ensuring your new home smells as fresh as it looks and feels.
Starting with a neutral, clean-smelling environment is essential for making a space feel truly new. In Madison, where homes are often sealed up tight during cold winters, stale air and old odors can become trapped. Addressing this before you unpack means you’re not just masking old smells with your own but are creating a genuinely healthy and welcoming atmosphere from day one.
How to Freshen Your Indoor Air
Here’s a practical guide to eliminating odors and improving your home’s air quality:
Ventilate Thoroughly: The simplest step is often the most effective. If weather permits, open all windows and doors for at least 24-48 hours. This allows trapped pollutants and stale air to escape, creating a massive improvement in freshness.
Neutralize, Don't Mask: Avoid scented candles or plug-in air fresheners that just cover up smells. Instead, place bowls of baking soda or activated charcoal in each room to absorb and neutralize odors naturally.
Check the HVAC Filter: A dirty, clogged HVAC filter will just circulate dust, dander, and musty smells throughout your home. Replace it with a fresh, high-quality filter before turning on your system for the first time.
Invest in an Air Purifier: Run a HEPA air purifier during and after your cleaning activities. It will capture airborne dust, allergens, and other particles kicked up during the cleaning process, leaving you with cleaner air.
Consider Professional Help: For severe, stubborn smells like heavy smoke or persistent pet odors, a professional ozone treatment may be necessary to completely eradicate the problem at its source.
Deep cleaning is one of the best ways to get a head start on a healthy home environment. You can learn more about how to improve air quality with deep cleaning in Madison and create the freshest start possible.
10. Final Walkthrough Inspection and Touch-Ups
After hours of scrubbing, wiping, and vacuuming, the final walkthrough is your quality control check. This isn't just a quick glance around; it's a systematic inspection to catch any missed spots before you move a single box in. This crucial last step on your move in clean checklist ensures the entire property meets your standards and prevents the frustrating discovery of a dusty corner or sticky handle on move-in day.
This practice is standard for professional property managers and real estate agents in Madison for a reason: it guarantees the home is truly ready. Taking the time for a detailed inspection separates a good clean from a great one, giving you complete peace of mind that your new space is a fresh, healthy, and welcoming environment from the moment you get the keys.
How to Conduct a Flawless Final Inspection
Here’s a practical approach to ensure nothing gets overlooked during your final check:
Use Natural Light: Perform your walkthrough during the day with all the blinds and curtains open. Sunlight is the best tool for revealing dust, streaks on windows, and smudges that artificial lighting can hide.
Change Your Perspective: Don't just stand in the middle of the room. Crouch down to inspect baseboards and flooring at eye level. Look up at ceiling fans, light fixtures, and high corners where cobwebs often reappear.
Document Everything: Use your phone to take photos of any areas that need a touch-up. This creates a visual to-do list and is also helpful for your records, especially if you're renting.
Test All Utilities: As part of your inspection, flick every light switch, run the faucets to check for hot water, test outlets, and run appliances briefly. This confirms everything is in working order before your belongings arrive.
A final, thorough inspection is what makes a new house feel like a clean home. If you've completed your checklist and still feel overwhelmed, or just want a professional's seal of approval, give us a call at (608) 292-6848 for a move-in clean you can trust.
Move-In Clean: 10-Point Comparison
Task | 🔄 Implementation Complexity | ⚡ Resources & Time | ⭐ Expected Quality | 📊 Expected Outcomes | 💡 Ideal Use Cases |
|---|---|---|---|---|---|
Deep Clean Walls and Remove Marks | Medium — requires careful technique to avoid finish damage | Magic erasers, gentle cleaners, microfiber, step stool; moderate time | ⭐⭐⭐ — strong cosmetic improvement for most marks | Removes scuffs/stains; reveals repair needs; improves hygiene | Prep for painting; rental inspections; cosmetic refresh |
Kitchen Deep Clean and Degreasing | High — intensive, detailed degreasing and safe chemical use | Commercial degreasers, brushes, appliance access, ventilation; high time | ⭐⭐⭐⭐ — high impact on safety and function when done well | Eliminates grease/contaminants; prevents pests; extends appliance life | Move-in kitchens; prior to cooking or inspections |
Bathroom Sanitization and Disinfection | High — uses strong chemicals and requires PPE/ventilation | Bleach/disinfectants, grout tools, mask/gloves; high effort | ⭐⭐⭐⭐ — critical for hygiene and pathogen removal | Kills bacteria/mold; improves air quality; removes hard-water stains | Hygiene-critical moves; bathrooms with visible contamination |
Floor Cleaning and Preparation | Medium — method varies by floor type to avoid damage | Vacuum, mop, carpet shampooer, floor-specific cleaners; moderate–high time | ⭐⭐⭐⭐ — greatly reduces allergens and visible dirt | Removes dust/allergens; reveals floor condition; readies for furniture | Before moving furniture; allergy-sensitive households |
Window and Glass Cleaning | Low–Medium — technique-sensitive to avoid streaks | Squeegee, microfiber, ladder for exterior; low–moderate time | ⭐⭐⭐⭐ — high visual improvement when done properly | Restores natural light/views; improves curb appeal | Showings, immediate aesthetic boost, brightening interiors |
Ceiling and Light Fixture Cleaning | Medium — requires safe access and dust control | Extension duster, step stool/ladder, drop cloths; low–moderate time | ⭐⭐⭐ — improves appearance and fixture performance | Removes dust/cobwebs; increases light output; improves air quality | Deep cleans, allergy reduction, preparing rooms for occupancy |
Closet and Storage Area Cleaning | Medium — many small spaces; attention to detail | Cloths, vacuum, shelf liners, mild cleaners; moderate time | ⭐⭐⭐ — provides sanitary storage conditions | Cleans shelves/rods; reveals moisture or pest issues; readies storage | Moving belongings in; addressing storage contamination or pests |
Door, Frame, and Hardware Sanitization | Low — straightforward but detail-oriented | Disinfectant wipes/sprays, microfiber, light lubricant; low time | ⭐⭐⭐ — quick, high-touch hygiene improvement | Reduces pathogens on high-touch points; improves door function | Quick sanitization before move-in; high-touch area focus |
Interior Air Quality and Odor Removal | Medium–High — may need repeated or professional treatment | Air purifiers, baking soda/charcoal, HVAC filter change, possible ozone; variable time | ⭐⭐⭐ — depends on odor source and treatment intensity | Reduces odors/allergens; improves respiratory comfort | Properties with smoke/pet odors or sensitive occupants |
Final Walkthrough Inspection and Touch-Ups | Low–Medium — systematic quality control step | Checklist, camera, basic cleaning/touch-up supplies; moderate time | ⭐⭐⭐⭐ — ensures consistent overall quality | Identifies missed areas; documents condition; final corrections | Final step before move-in; landlord/property manager handoff |
Ready to Move In? Let Us Handle the Cleaning!
Moving is undoubtedly one of life's most demanding events. Between coordinating movers, packing boxes, and managing a thousand tiny details, the last thing you want to worry about is scrubbing a new, empty house. This comprehensive move in clean checklist was designed to give you a clear roadmap, transforming that empty space into a truly fresh, welcoming, and healthy home for you and your family.
We've covered everything from the top down, starting with often-overlooked ceiling fans and light fixtures, all the way to the baseboards and floors. By following this systematic approach-tackling dry tasks before wet ones and working from the highest point in a room downwards-you can ensure no surface is missed. The checklist provides a structured plan to methodically sanitize bathrooms, degrease kitchen appliances, and prepare every nook and cranny for your arrival.
Key Takeaways for a Flawless Move-In Clean
Remembering these core principles will make your cleaning process more efficient and effective:
The Top-Down, Dry-to-Wet Method: Always start with dusting high surfaces like light fixtures and the tops of cabinets before moving to countertops and, finally, floors. This ensures you're not re-cleaning surfaces as dust and debris fall. Similarly, complete all your dry cleaning (sweeping, dusting) before introducing any water or cleaning solutions for mopping or wiping.
Prioritize Health and Safety: The kitchen and bathrooms are ground zero for germs. Prioritizing the deep cleaning and sanitization of these areas-disinfecting countertops, scrubbing toilets and showers, and ensuring food preparation surfaces are pristine-is non-negotiable for a healthy living environment.
Don't Forget the Details: True cleanliness lies in the details. Wiping down light switches, disinfecting doorknobs, cleaning inside closets, and washing window tracks are the small steps that make a massive difference in how clean your new home feels. These are the tasks that separate a quick wipe-down from a professional-grade clean.
Your Next Step: From Checklist to Clean Home
The value of a meticulously executed move-in clean cannot be overstated. It sets the stage for your new life in the space, removing the remnants of previous occupants and ensuring a healthy start. It’s about more than just appearances; it's about peace of mind, knowing your family is settling into a sanitized, allergen-free environment.
For many Madison residents, from students moving out of UW housing to families settling in Verona or Fitchburg, time is the most valuable resource during a move. While this checklist provides the ultimate DIY guide, the hours and energy required are significant. If you find yourself staring at this list and feeling overwhelmed, know that there's a simpler, more effective solution.
Hiring a professional service like Shiny Go Clean can be the best investment you make in your move. We live and breathe this move in clean checklist every day. Our expert teams are equipped with the right tools and professional-grade products to execute every task to perfection. We handle everything from a quick oven cleaning in Madison to comprehensive deep cleaning for larger family homes. We understand the specific challenges of Madison homes-from high-dust lake areas to the grime left after a long Wisconsin winter. Let us handle the dirty work, so you can focus on the excitement of unpacking and making your new house a home.
Ready to experience a truly stress-free move-in day? Let Shiny Go Clean provide a pristine, welcoming home for your family. Visit us at Shiny Go Clean to get your instant quote or call us at (608) 292-6848 to book your professional move-in cleaning today.
Comments