Your Ultimate Apartment Moving Out Cleaning Checklist for Madison, WI
- Jan 14
- 19 min read
Moving out of a Madison apartment, whether it's a cozy spot downtown or a place near UW, is a huge task. Between packing boxes and coordinating movers, the final clean-out can feel overwhelming. But that final clean is your ticket to getting your full security deposit back. A landlord's inspection can be tough, especially with our cold winters tracking in grime and high-dust lake areas settling everywhere. This isn't just about wiping counters- it's a deep, detailed process that requires a solid plan.
That's why we've put together the ultimate apartment moving out cleaning checklist, breaking down everything you need to do, room by room. Think of us as your helpful neighbor, here to guide you through the process so you can hand over those keys with confidence. We’ll cover the supplies you’ll need, the exact spots landlords always check, and a realistic timeline for tackling each task without the last-minute stress.
The goal is simple: to help you secure that full deposit return. Landlords have a specific list of what they look for, from spotless ovens to dust-free baseboards. Getting this right not only satisfies your lease agreement but also sets a positive final impression. To further protect your deposit and understand the specific regulations regarding security deposits, particularly in a different jurisdiction like Texas, it's always wise to be informed about tenant rights. This guide provides the actionable steps you need to ensure your old Madison apartment is left sparkling and your deposit check is in the mail.
1. Deep Clean Carpets and Hard Floors
Floors are one of the first things landlords inspect, as they show years of foot traffic, accidental spills, and daily life. A simple vacuum or mop won't cut it for a move-out clean; you need a true deep clean to tackle embedded dirt, stubborn stains, and lingering pet odors. This step is a non-negotiable part of any complete apartment moving out cleaning checklist and is critical for getting your full security deposit back.
For carpets, this means more than a rental machine. Professional steam cleaning or hot water extraction is necessary to lift deep-set grime from high-traffic areas like hallways and living rooms. For hard surfaces, it involves thoroughly cleaning grout lines in kitchens and bathrooms, and ensuring surfaces like hardwood or laminate are spotless without residue. Restoring floors to their original condition proves you've cared for the property.

Why This Is Crucial for Your Deposit
Landlords often withhold deposit funds for professional floor cleaning if they notice stains, discoloration, or odors. Tackling this yourself-or hiring a pro-is a direct investment in getting your money back.
Example 1: Pet Odor Removal: A Madison tenant used professional carpet cleaning to eliminate dog odors from a bedroom, passing the final inspection without any deductions.
Example 2: Stain Elimination: A family successfully had a red wine stain removed from their living room carpet, a fix that would have otherwise cost a significant portion of their deposit.
Example 3: Hard Floor Restoration: In a downtown apartment, deep cleaning restored tile grout in the bathroom from a dingy gray back to its near-original white, impressing the property manager.
Pro Tips for Flawless Floors
To ensure your floors pass the final walkthrough, timing and preparation are key. Don't leave this task for the last minute.
Schedule Smart: Book a professional cleaning for 1-2 days before your final walkthrough. This allows ample drying time-usually 4-8 hours for carpets.
Pre-Treat Stains: Address any noticeable stains with a spot treatment 24 hours before the deep clean.
Document Everything: Take "after" photos of the clean carpets and floors as proof for your landlord, comparing them to your move-in photos if possible.
Use the Right Products: If you have hardwood, using appropriate cleaners is vital to avoid damage. Learn more about non-toxic hardwood floor cleaners for Madison homes.
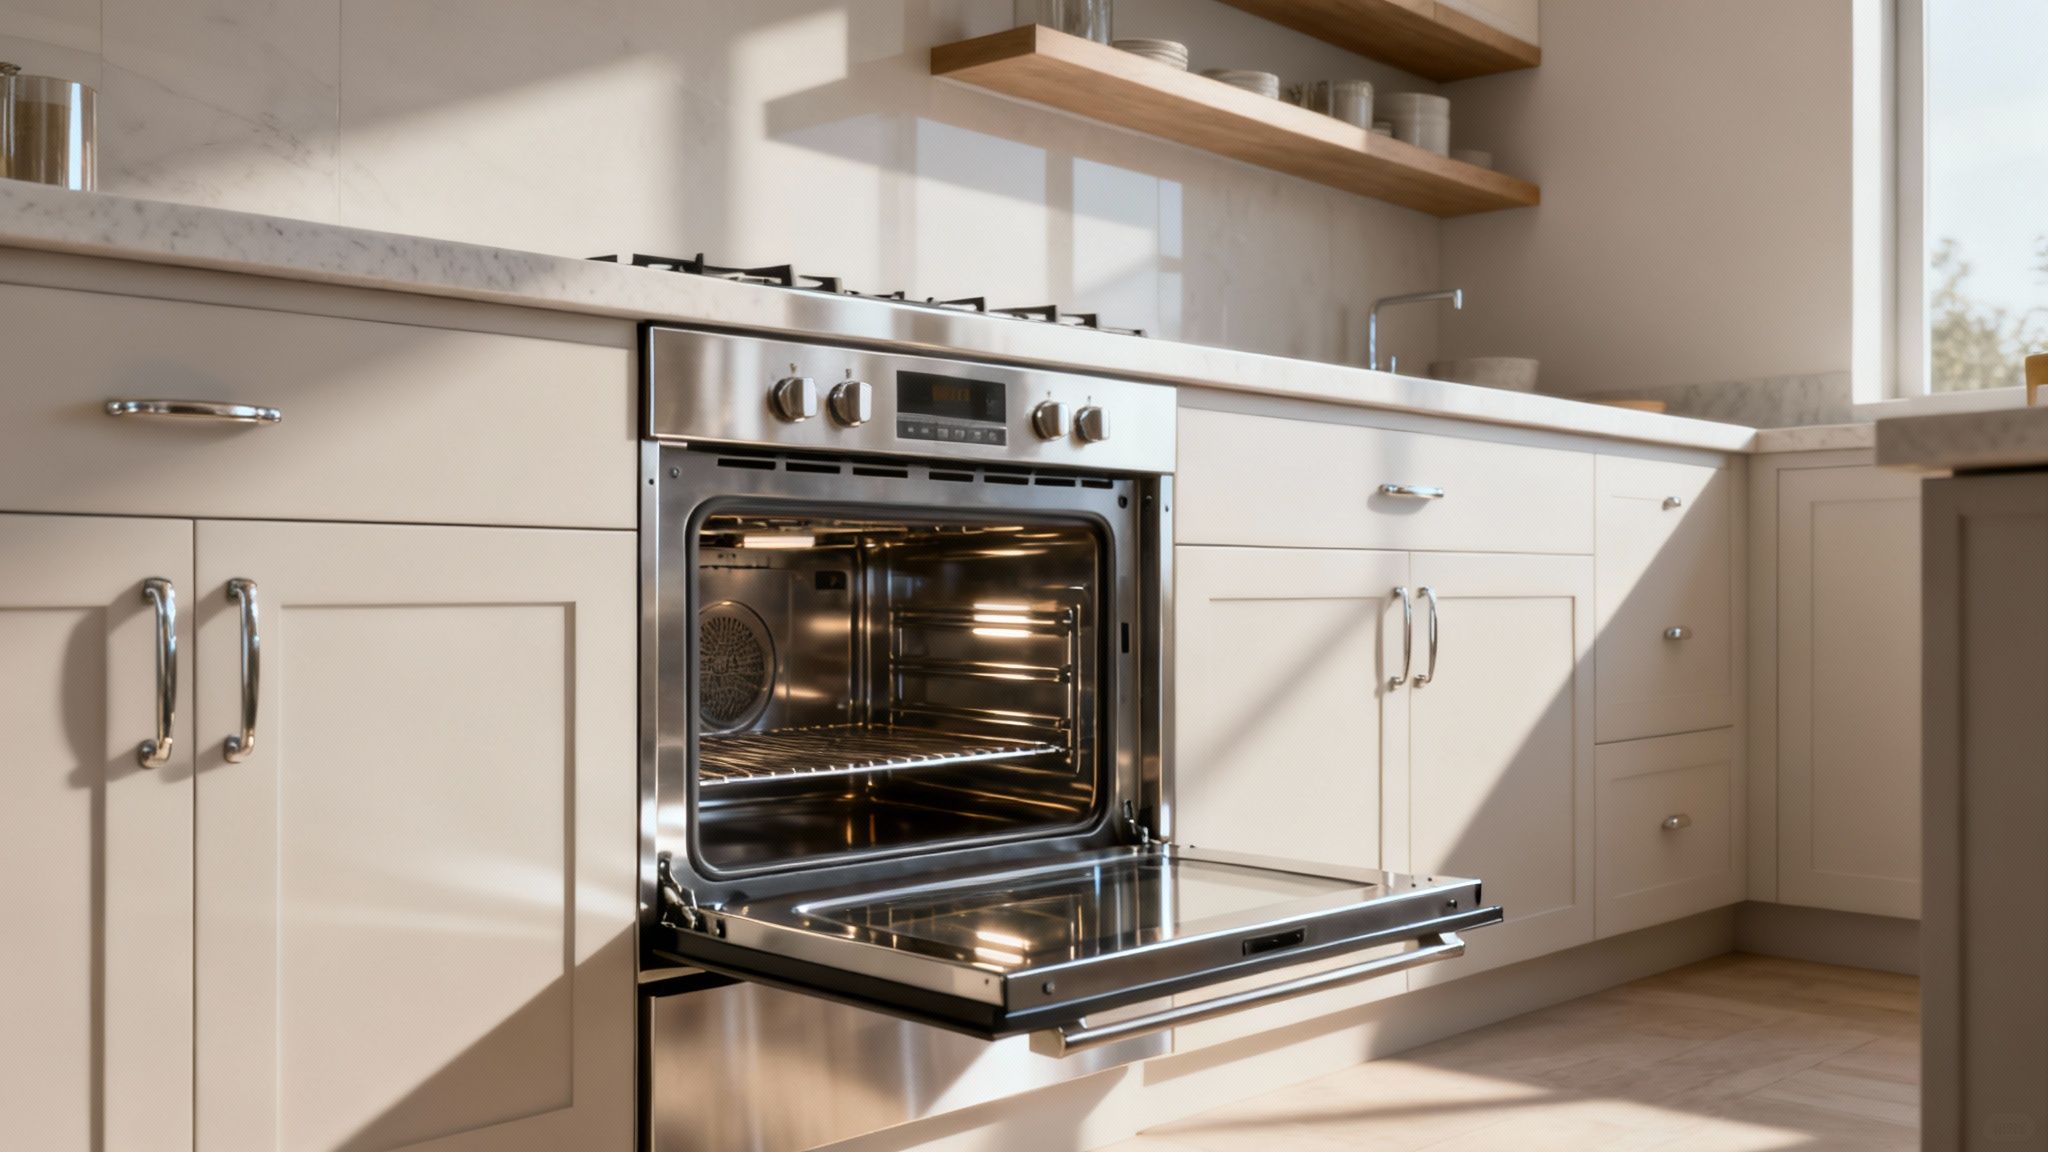
2. Clean Kitchen Appliances and Cabinetry Inside and Out
The kitchen is often the centerpiece of a landlord's inspection, as its condition speaks volumes about how well the apartment was maintained. Grease, food residue, and crumbs accumulate over time inside appliances and cabinets, making a surface-level wipe-down insufficient. A thorough, inside-and-out clean of every appliance and cabinet is a mandatory part of any apartment moving out cleaning checklist and a key factor in proving you've left the property in excellent shape.
This means tackling the often-neglected areas: degreasing the inside of the oven and microwave, removing all food particles from the refrigerator and dishwasher, and wiping down every single cabinet shelf and drawer. You also need to clean the exterior of all cabinets and polish the hardware, removing fingerprints and grease buildup that collects around handles and knobs. For landlords, a pristine kitchen signals a responsible tenant.
Why This Is Crucial for Your Deposit
Landlords will not hesitate to deduct cleaning fees for a greasy oven, a sticky refrigerator, or crumb-filled cabinets. The cost of hiring a professional to fix these issues can be steep, so investing your time here directly protects your security deposit. A sparkling kitchen leaves a lasting positive impression during the final walkthrough.
Example 1: Oven Deep Clean: A UW Madison student avoided a $150 cleaning fee by using an oven-specific cleaner to remove baked-on residue from their downtown apartment oven, passing the inspection with flying colors.
Example 2: Cabinet Degreasing: In Fitchburg, a tenant meticulously degreased all kitchen cabinet fronts, which had accumulated a sticky film, ensuring they received their full deposit back.
Example 3: Appliance Detailing: A family in Verona emptied and scrubbed their refrigerator and dishwasher interiors, removing all food stains and odors, which was specifically noted as "excellent condition" on their move-out report.
Pro Tips for a Spotless Kitchen
A systematic approach is the best way to conquer the kitchen. Plan to dedicate several hours to this task, as it's more time-consuming than it appears.
Use a Degreaser: For tough buildup on stovetops, range hoods, and cabinet doors, a commercial-grade degreaser is your best friend. Let it sit for at least 30 minutes to break down grime.
Empty Everything First: Before you start, completely empty the refrigerator, freezer, and all cabinets. This makes cleaning faster and more effective.
Wipe with Microfiber: Use damp microfiber cloths to wipe down interior shelves and drawers. They pick up dust and crumbs without leaving streaks or lint behind.
Don't Forget the Details: Polish all hardware-handles and knobs-to make the cabinetry look new. Also, remember to pull out the refrigerator to clean the coils and the floor underneath.
Document Your Work: Take clear before-and-after photos of the clean oven, refrigerator interior, and empty cabinets as proof of your hard work for the landlord.
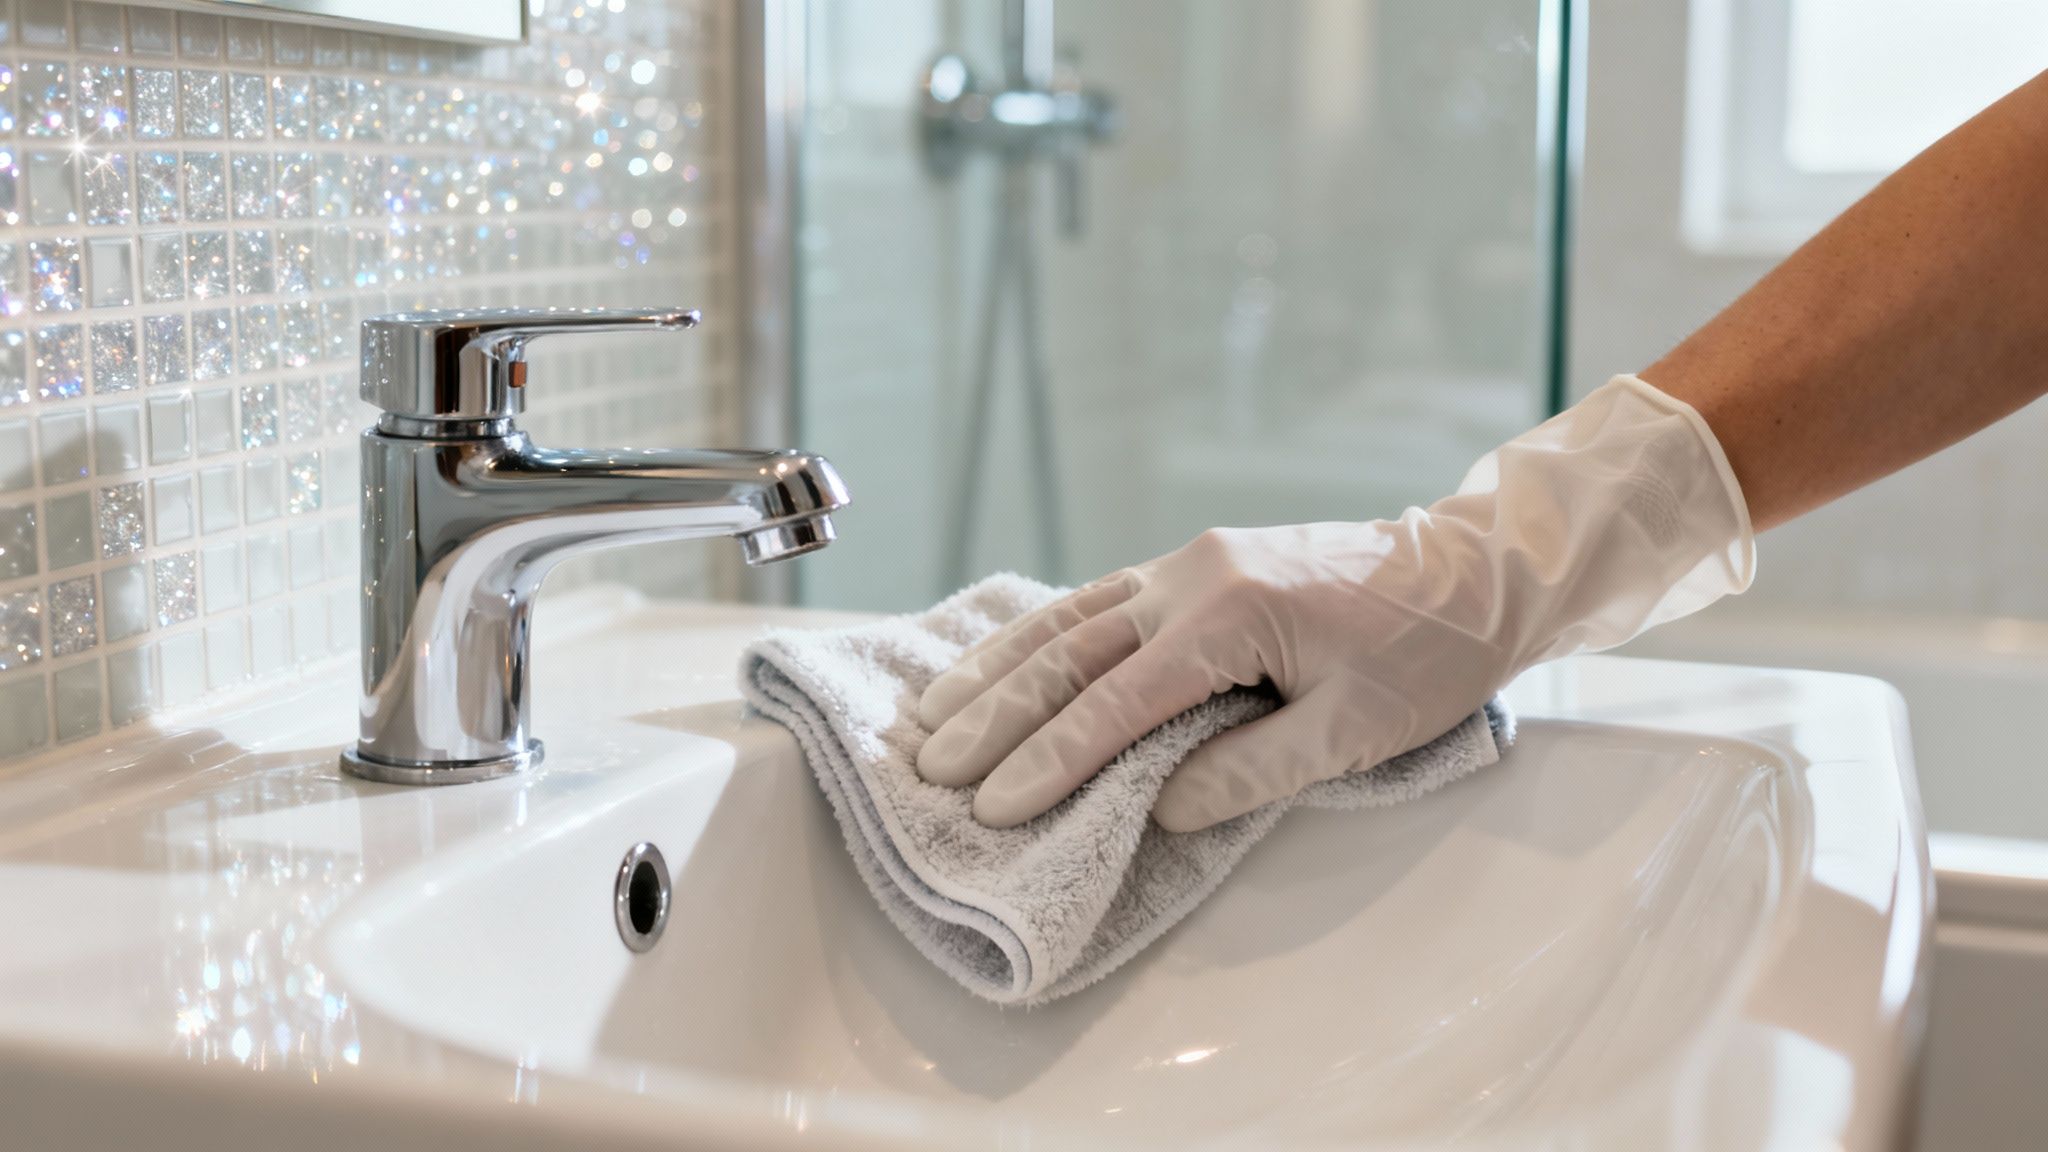
3. Sanitize Bathrooms and Fixtures
The bathroom is a high-scrutiny area during a landlord's final inspection, as it clearly shows signs of neglect like soap scum, mildew, and hard water stains. A standard wipe-down is insufficient; a move-out clean requires a deep sanitization of every surface, from the toilet bowl to the shower grout. This step is a cornerstone of a thorough apartment moving out cleaning checklist, ensuring the space is hygienic and ready for the next tenant.
Thorough sanitization means tackling built-up grime that accumulates over a tenancy. This includes scrubbing toilets inside and out, disinfecting sinks and faucets until they shine, deep cleaning shower tiles and grout lines, and completely removing soap scum from glass doors. Addressing persistent issues like mold, mildew, and stubborn hard water stains is non-negotiable for proving you've maintained the property to a high standard.
Why This Is Crucial for Your Deposit
Landlords will quickly deduct funds from a security deposit to cover professional cleaning costs for a dirty bathroom. Issues like mold in the shower caulking or a stained toilet are immediate red flags that can cost hundreds to fix. Investing the time to sanitize properly protects your deposit.
Example 1: Mold Remediation: A Fitchburg renter used an antifungal treatment to eliminate black mold spots from the shower grout, preventing a costly professional remediation charge from their landlord.
Example 2: Hard Water Stain Removal: A downtown Madison tenant used a specialized cleaner to remove severe hard water stains from chrome faucets and the shower head, restoring them to their original shine.
Example 3: Toilet Restoration: After scrubbing away a stubborn ring, a tenant successfully returned the toilet bowl to its original pristine white, passing the final walkthrough without issue.
Pro Tips for a Spotless Bathroom
Proper technique and products are essential for getting the bathroom back to move-in condition. Don't rush this critical task.
Allow Dwell Time: Let grout cleaner and toilet bowl cleaner sit for at least 15-20 minutes before scrubbing. This allows the products to break down grime, making your job easier.
Ventilate Properly: Keep the bathroom fan on and a window open when using strong disinfectants to ensure proper air circulation and eliminate harsh fumes.
Use the Right Tools: A dedicated grout brush is perfect for scrubbing tile lines without scratching the tile itself. A pumice stone can be a lifesaver for tough toilet rings.
Don't Forget the Details: Remember to clean and sanitize the ventilation fan cover, light fixtures, and inside the medicine cabinet and drawers.
Tackle Tough Stains: Stubborn toilet rings can be a real challenge. For expert advice, check out our guide on how to remove stubborn toilet ring stains in Madison.
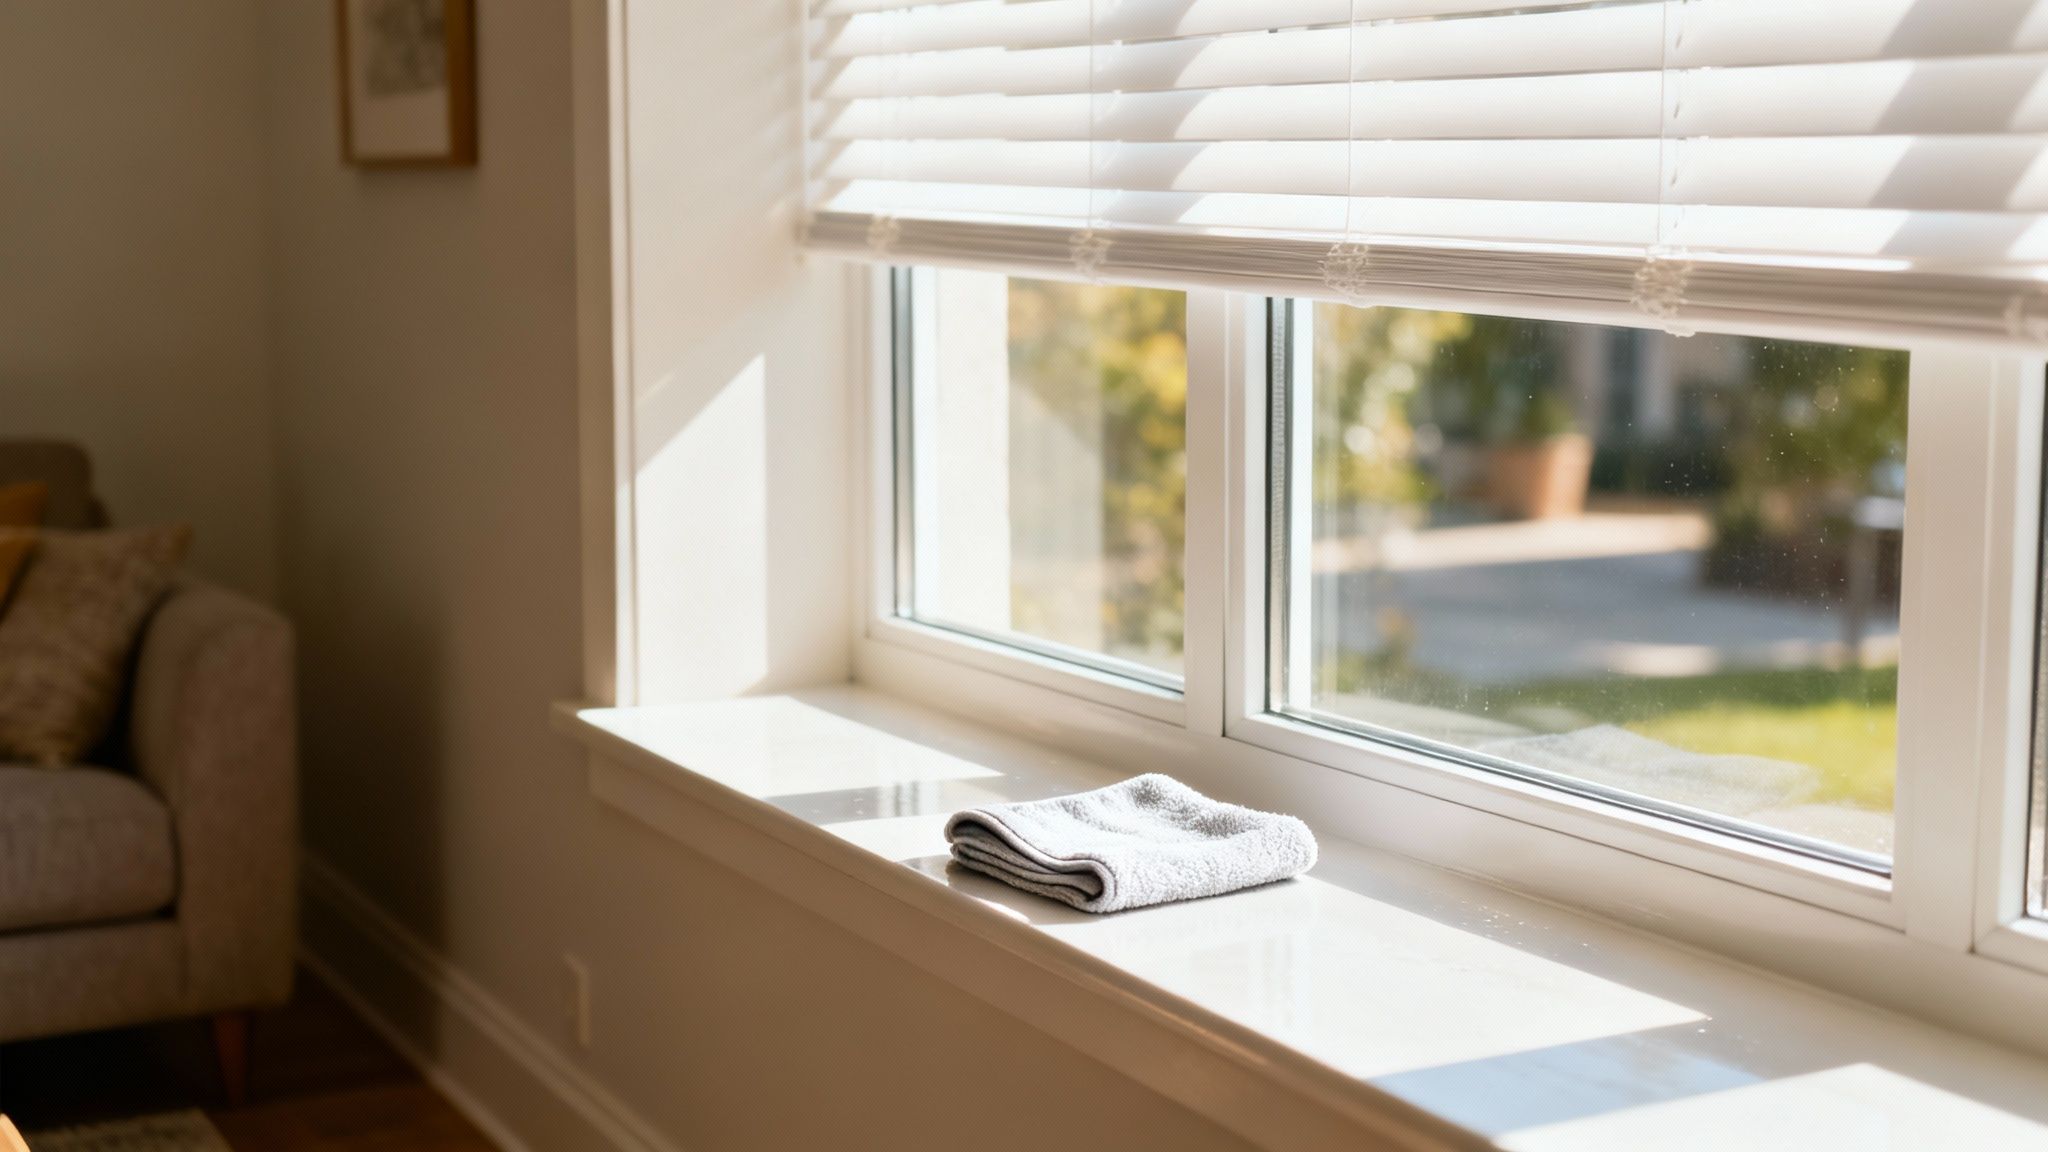
4. Dust and Clean All Window Treatments and Glass
Often overlooked until the very end, windows and their treatments act as frames for a room's first impression. Years of dust, fingerprints, water spots, and debris build up on glass, sills, and blinds, creating a dingy look that landlords notice immediately. A thorough cleaning of every component is a key part of your apartment moving out cleaning checklist, transforming the space and showing meticulous care for the property.
This task goes beyond a quick wipe-down. It involves methodically cleaning every individual blind slat, scrubbing grime from window tracks, and achieving a streak-free shine on the glass itself. In places like downtown Madison apartments, clean windows that let in maximum light can make a small space feel bigger and brighter, significantly impacting the final walkthrough.
Why This Is Crucial for Your Deposit
Landlords will deduct from your security deposit for cleaning services if they find dusty blinds, dirty window sills, or smudged glass. The labor-intensive nature of this task makes professional cleaning expensive, so handling it yourself saves money and protects your deposit.
Example 1: Blind Dust Removal: A Fitchburg tenant meticulously cleaned the dust off more than 15 individual blind slats in each bedroom, a detail the property manager specifically noted and approved.
Example 2: Hard Water Spot Elimination: After years of shower spray, a tenant in a Monona apartment used a vinegar solution to successfully remove stubborn hard water spots from the bathroom mirror and window.
Example 3: Crystal Clear Finish: By using a squeegee, a UW Madison student achieved a perfectly clear, streak-free finish on their living room windows, making the apartment look pristine for the final inspection.
Pro Tips for Flawless Windows
A systematic approach ensures no detail is missed and the results are professional-grade. Work from top to bottom and inside to out for the best outcome.
Clean in Order: Always dust blinds and clean the window frames and sills before cleaning the glass. This prevents dirt and dust from falling onto your freshly cleaned surfaces.
Use the Right Tools: For a streak-free shine, use a quality squeegee and microfiber cloths. An old sock placed over your hand works perfectly for pinching and wiping each side of a blind slat quickly.
Tackle the Tracks: Use a small detail brush or a crevice tool on your vacuum to remove all the built-up dirt, bugs, and debris from the window tracks.
DIY Cleaning Solution: A simple, cost-effective solution of equal parts white vinegar and water is excellent for cutting through grime and removing hard water spots without harsh chemicals.
5. Wipe Down Walls, Baseboards, and Door Frames
Walls and baseboards often bear the hidden story of your time in an apartment-from shoe scuffs in the entryway to fingerprints around light switches. Landlords look closely at these surfaces because they reveal the overall level of care a tenant has shown. A thorough wipe-down is a vital part of any apartment moving out cleaning checklist, as it removes the daily grime that accumulates over time and prevents deductions for what might be considered excessive wear and tear.
This task goes beyond a quick dusting. It involves carefully cleaning entire wall surfaces where needed, paying special attention to high-traffic areas, corners where dust gathers, and the trim that frames every room. Door frames, doors, and baseboards are magnets for scuffs, handprints, and dirt. Addressing these areas demonstrates a commitment to returning the property in excellent condition, directly impacting your security deposit return.
Why This Is Crucial for Your Deposit
Property managers frequently charge for repainting or deep cleaning fees if walls and trim are left dirty or scuffed. Even minor marks can add up, leading to significant deductions from your security deposit for labor and materials.
Example 1: Scuff Mark Removal: A tenant in Fitchburg used a melamine foam sponge to gently lift dark scuff marks from their hallway walls, avoiding a repainting charge on their final inspection.
Example 2: Fingerprint and Grime Cleanup: Near UW Madison, a student meticulously cleaned fingerprints and smudges from all doors and light switch plates, a detail the landlord specifically praised during the walkthrough.
Example 3: Baseboard Restoration: A family in a downtown Madison apartment vacuumed and then wiped down all their baseboards, removing a thick layer of dust and making the entire unit look freshly cleaned.
Pro Tips for Spotless Walls and Trim
To get your walls and trim looking their best without causing damage, use the right tools and a careful approach. This is a task that requires patience, not harsh scrubbing.
Test First, Clean Second: Always test your cleaning solution (even a gentle one) on a small, hidden spot-like inside a closet-to ensure it doesn't damage the paint.
Vacuum Before Wiping: Use a brush attachment on your vacuum to remove loose dust and cobwebs from baseboards and corners before you wipe them down. This prevents smearing dirt around.
Use Gentle Pressure: When using a tool like a Magic Eraser, use light pressure to avoid "burnishing" or removing the paint's finish, which can be just as noticeable as the original mark.
Don't Forget the Details: Wipe down all light switches, outlet covers, thermostat controls, and the tops and sides of door frames where dust loves to settle.
6. Deep Clean Closets and Storage Spaces
Often overlooked, closets and storage areas are magnets for dust, cobwebs, and forgotten scuff marks. A landlord will almost always open every closet door during the final walkthrough, as these spaces reveal a lot about how well a tenant has maintained the property. Simply emptying them isn't enough; they need to be meticulously cleaned to look fresh and well-cared-for, a key part of any thorough apartment moving out cleaning checklist.
This means getting into every corner, wiping down every surface, and ensuring the space is free of debris. You’ll need to vacuum floors, wipe down shelves and rods, clean the walls, and check that doors and hardware function properly. A truly clean closet shows you paid attention to the details, which builds confidence with your property manager and helps secure your deposit.
Why This Is Crucial for Your Deposit
Landlords see dirty closets as a sign of general neglect and may use it as a reason to deduct cleaning fees. Scuff marks, stained shelves, or dusty corners can suggest the entire apartment wasn't properly cleaned.
Example 1: Dust and Debris Removal: A UW Madison student vacuumed years of accumulated dust from their bedroom closet corners and wiped down the wire shelving, passing a notoriously strict inspection.
Example 2: Stain and Mold Mitigation: A tenant in a downtown Madison apartment noticed small mold spots in a humid bathroom closet. They cleaned it with a mold-killing solution, preventing a potential health-related charge.
Example 3: Wall and Fixture Cleaning: Before moving out, a family wiped down the closet walls and cleaned the metal hanging rod, removing fingerprints and smudges to make the space look almost new.
Pro Tips for Spotless Closets
To ensure your storage spaces meet landlord expectations, a systematic approach is best. Don't treat this as an afterthought.
Clean When Empty: The best time to clean closets is immediately after you've moved all your belongings out. This gives you unobstructed access to every surface.
Use the Right Tools: A vacuum with a detail brush attachment is perfect for getting into tight corners and along baseboards. Use a damp microfiber cloth for wiping shelves to trap dust effectively.
Inspect and Document: As you clean, check for water stains or musty smells that could indicate ventilation issues. Note any pre-existing damage and compare it to your move-in photos.
Check Door Functionality: Ensure closet doors open, close, and latch smoothly. A little lubricant on the hinges can solve minor squeaks or stiffness.
7. Remove Stains from Carpets and Address Odors
Stubborn stains and lingering odors are red flags for landlords and can be one of the quickest ways to lose a chunk of your security deposit. Spills from coffee, pet accidents, or food can leave behind unsightly marks that a standard vacuuming won't fix. This specialized step in your apartment moving out cleaning checklist focuses on targeted treatments that restore the carpet's appearance and eliminate smells, proving you’ve left the unit in excellent condition.
Professional stain removal goes beyond store-bought sprays, using advanced techniques like spot treatments, enzyme-based cleaners for organic matter like pet urine, and oxidation methods for tough discolorations. Odor elimination is just as important, as smells from pets, smoke, or cooking can embed themselves deep into carpet fibers. Addressing these specific issues is crucial for passing the final inspection and ensuring a smooth move-out process.
Why This Is Crucial for Your Deposit
Landlords will not hesitate to hire their own expensive remediation services for stains and odors, billing you directly from your deposit. By proactively handling these issues, you control the cost and demonstrate responsible tenancy, making it much harder for them to justify deductions.
Example 1: Pet Stain Success: A renter in Fitchburg had professional enzyme treatments remove old pet urine stains from a bedroom corner, completely eliminating both the spot and the odor, which passed the landlord’s blacklight test.
Example 2: Beverage Spill Removal: A tenant near UW Madison successfully had a dark coffee stain lifted from their living room carpet right before their move-out inspection, saving them a potential replacement charge.
Example 3: Odor Neutralization: After a professional cleaning, a downtown Madison apartment was cleared of lingering cooking odors that had settled into the carpet, ensuring the property manager signed off without issue.
Pro Tips for Flawless Carpets
Tackling tough spots and smells requires the right approach and timing. Don't wait until the last minute to discover a stain you forgot about.
Act Quickly: Identify and pre-treat any stains you notice as early as possible. The longer a stain sits, the harder it is to remove.
Use Enzyme Cleaners for Pet Issues: For pet accidents, enzyme-based cleaners are the most effective solution as they break down the organic proteins causing the stain and odor.
Test First: Always test any cleaning product on an inconspicuous area of the carpet, like inside a closet, to ensure it doesn't cause discoloration or damage.
Let It Dwell: Allow treatment products to sit for the recommended time before blotting or extraction. This gives the solution time to work deep in the fibers.
Call the Pros for Tough Jobs: For mystery stains or persistent odors, professional move out cleaning Fitchburg services are your best bet. Give Shiny Go Clean a call at (608) 292-6848 to see how we can help.
8. Clean HVAC Systems, Vents, and Air Filters
Often overlooked, the HVAC system and its vents are a major source of dust and allergens that accumulate over your tenancy. Landlords are increasingly checking these areas because a clogged system runs inefficiently and impacts air quality for the next resident. Addressing vents and filters is a crucial, modern addition to any apartment moving out cleaning checklist that demonstrates meticulous care for the property's core systems.
Cleaning this system means more than a quick wipe. It involves replacing the main HVAC filter, vacuuming dust and pet hair from return air vents, and cleaning the grilles on supply vents throughout the apartment, including the often-forgotten bathroom exhaust fan. Leaving these components clean and clear of debris is a sign of a responsible tenant and helps ensure the apartment is truly ready for turnover.
Why This Is Crucial for Your Deposit
A landlord may charge you for a professional HVAC service call if they find a filter that's black with dirt or vents caked in dust, citing neglect. Taking care of this yourself is a simple step to prevent a potentially expensive deduction from your deposit.
Example 1: Filter Replacement: A UW Madison student avoided a $100 service fee by replacing a filthy HVAC filter that hadn't been changed in over a year, a simple fix noted by the property manager.
Example 2: Pet Hair Removal: In Fitchburg, a tenant with two cats thoroughly vacuumed all return air vents, preventing any complaints about lingering pet dander or air quality.
Example 3: Contamination Prevention: A family in Monona cleaned all ceiling supply vents and the bathroom exhaust fan, a detail that helped them pass the final inspection without any issues noted.
Pro Tips for Spotless Vents
Properly cleaning your apartment's ventilation system shows a high level of detail and care.
Get the Right Filter: Before you shop, take a picture of your current HVAC filter to ensure you buy the correct size and type for replacement.
Use a Brush Attachment: Use your vacuum's detail brush attachment to gently clean dust from vent grilles without scratching them. Wipe any remaining grime with a damp microfiber cloth.
Know Your System: Beyond just dusting and wiping down, maintaining good air quality involves understanding when to replace key components. For example, knowing how often you should change your air filters is critical for both your health and passing the inspection.
Don't Forget the Bathroom: The bathroom exhaust fan grille is a magnet for dust and moisture. Wipe it down carefully to prevent mold growth and show a thorough clean. Find more tips on tackling these overlooked areas with these solutions for dusty air vents in your home.
9. Final Walkthrough Documentation and Quality Assurance
The final walkthrough is your last chance to prove you’ve left the apartment in pristine condition. It's more than a quick glance around; it's a systematic quality assurance check where you document every cleaned surface, corner, and appliance. This crucial step transforms your cleaning efforts from a simple task into undeniable proof, creating a comprehensive record that protects you against unfair deposit claims.
This final verification, a key part of any apartment moving out cleaning checklist, involves going room-by-room with your checklist in hand. You'll compare the finished work against your lease requirements, taking timestamped photos and videos of everything. From sparkling clean ovens to dust-free baseboards, this documentation serves as your evidence, ensuring every detail is accounted for before you hand over the keys.
Why This Is Crucial for Your Deposit
Landlords often rely on vague claims of "uncleanliness" to withhold funds. Without clear, dated proof of the apartment's condition upon your departure, it becomes your word against theirs. This documentation is your most powerful tool in preventing and resolving security deposit disputes.
Example 1: Appliance Dispute: A Madison tenant used timestamped photos of a spotless oven and refrigerator interior to successfully challenge a landlord's claim for a "kitchen deep cleaning fee."
Example 2: Video Evidence: A UW Madison student recorded a continuous video walkthrough, narrating the condition of each room. This video was instrumental in getting their full deposit back when the property manager initially noted "scuffs" that were present at move-in.
Example 3: Pre-Existing Damage Proof: A tenant photographed a chipped countertop corner-noted on their move-in sheet-to prove the damage was pre-existing, avoiding a wrongful deduction.
Pro Tips for Flawless Documentation
Your goal is to create an airtight record that leaves no room for debate. Be meticulous and organized during this final step.
Use a Timestamp App: Download an app that adds a date and time stamp directly onto your photos and videos for indisputable proof of when they were taken.
Narrate Your Video: As you record a video walkthrough, speak clearly and describe what you're seeing. For example, say, "Here is the empty and cleaned master bedroom closet on May 30th at 2:00 PM."
Document Functionality: Briefly film yourself turning on faucets, flushing toilets, and switching on lights to show everything is in working order.
Request a Joint Walkthrough: Invite your landlord to do the final walkthrough with you. It's the best way to address any potential issues on the spot and get immediate sign-off. Learn more about how to get your security deposit back in Madison, WI.
9-Point Move-Out Cleaning Checklist Comparison
Task | 🔄 Implementation Complexity | ⚡ Resources & Time | 📊 Expected Outcomes | 💡 Ideal Use Cases | ⭐ Key Advantages |
|---|---|---|---|---|---|
Deep Clean Carpets and Hard Floors | High — specialized equipment & technique | Professional-grade extractors, floor strippers; time‑intensive; 4–8h drying | Restores appearance, removes embedded dirt/odors; improves deposit return | Move-out with heavy traffic or pet use; landlord inspections | Professional results > DIY; extends floor life |
Clean Kitchen Appliances and Cabinetry Inside and Out | High — labor-intensive, careful product use | Commercial degreasers, brushes, soak time; moderate–high time | Eliminates grease/food residue; prevents pests; improves inspections | Heavily used kitchens, realtor staging, move-out | High visual/inspection impact; increases marketability |
Sanitize Bathrooms and Fixtures | Medium–High — chemical handling, ventilation needed | Disinfectants, grout cleaners, ventilation; grout may be time-consuming | Kills pathogens, removes mold/mildew; meets health standards | Move-outs with mold/hard-water issues; health-sensitive tenants | Meets safety standards; prevents costly remediation |
Dust and Clean All Window Treatments and Glass | Medium — technique- and weather-dependent | Microfiber, squeegee, ladder; relatively quick for interiors | Clear glass, improved light and first impressions | Final walkthroughs, showings, exterior-exposed units | Affordable, high-visibility improvement |
Wipe Down Walls, Baseboards, and Door Frames | Medium — careful to avoid paint damage | Magic Eraser, microfiber, touch-up paint; moderate time | Removes scuffs and marks; reduces wall-related deductions | Hallways, high-traffic areas, move-out touch-ups | Low-cost, high visual impact |
Deep Clean Closets and Storage Spaces | Low–Medium — straightforward but detailed | Vacuum, detail brushes, microfiber; quick when empty | Removes dust, reveals hidden damage; supports inspections | Empty closets for move-out, storage odor checks | Often-overlooked; quick win for deposit recovery |
Remove Stains from Carpets and Address Odors | High — specialized chemistry and repeat treatments | Enzyme/oxidation products, professional spot tools; potentially costly | Targets deposit-threatening stains and odors; prevents failures | Pet accidents, wine/food spills, persistent odors | Can recover significant deposit value |
Clean HVAC Systems, Vents, and Air Filters | Medium — system knowledge and access required | Replacement filters, brushes, possible pro service; moderate time | Improves air quality and efficiency; reduces allergens | Allergy-sensitive tenants, long-term rentals, move-out | Enhances health, reduces energy costs, extends system life |
Final Walkthrough Documentation & QA | Medium — methodical documentation and verification | Camera/video, timestamped checklist, time for room-by-room review | Provides evidence for disputes; identifies missed work before landlord | All move-outs, potential deposit disputes, property managers | Protects both tenant and manager; prevents unexpected deductions |
Ready for a Stress-Free Move-Out? Let Us Handle the Cleaning!
Moving is a major life event, often ranked as one of the most stressful experiences right alongside changing jobs or planning a wedding. After weeks of sorting, packing, and coordinating logistics, the last thing you want to face is a grueling, top-to-bottom cleaning session. This comprehensive apartment moving out cleaning checklist is designed to be your roadmap, guiding you through every nook and cranny to ensure you leave your former home in pristine condition.
By following this guide, you’ve armed yourself with a powerful tool to protect your security deposit. We've broken down the process chronologically-from tasks you can tackle weeks in advance to the final-hour wipe-downs. You now understand the critical difference between a standard tidy-up and the deep, restorative clean that landlords and property managers in Madison expect.
Key Takeaways for a Successful Move-Out Clean
Remember, the goal is not just to clean but to restore the apartment to its original, move-in-ready state. Let’s recap the most crucial points from our checklist:
Focus on the "Big Three": Landlords almost always inspect the kitchen, bathrooms, and floors with the most scrutiny. Dedicate the majority of your time and effort to degreasing oven interiors, scrubbing grout lines, and ensuring all flooring is free of stains and scuffs. These areas are the biggest indicators of tenant care.
Don't Forget the Details: It's the small things that often cost renters their deposit. Wiping down baseboards, cleaning inside cabinets and drawers, dusting blinds slat by slat, and cleaning light fixtures and switch plates show a level of thoroughness that leaves a lasting positive impression.
Document Everything: Your smartphone is your best friend during a move-out. Before you start cleaning, take photos of any pre-existing damage. After you've finished, conduct your own final walkthrough and take detailed photos and videos of the sparkling results. This visual evidence can be invaluable in case of a dispute.
Mastering your move-out clean is about more than just getting your money back. It’s about closing a chapter on a positive note, maintaining a good rental history, and transitioning to your new home with one less major stressor on your plate. It's about the peace of mind that comes from knowing you’ve done everything right.
When to Call in the Professionals
Now, look at this list again. Be honest with yourself about the time, physical energy, and specialized supplies required to do it all properly. Between final packing, utility transfers, and setting up your new place, your time is incredibly valuable. This is where professional help isn't a luxury-it's a smart, strategic investment.
Here in Madison, from the bustling student turnovers around UW to the family homes in Fitchburg and Verona, landlords have high standards. They've seen it all. That's why a professional move-out cleaning service can be your secret weapon. We at Shiny Go Clean specialize in exactly this kind of detailed work. We bring the professional-grade equipment and eco-friendly supplies needed to tackle tough grime, and our experienced, background-checked teams know precisely what local property managers look for during inspections.
Instead of spending your last weekend in your old apartment on your hands and knees scrubbing, imagine spending it settling into your new home, knowing the cleaning is being handled perfectly. We offer straightforward, flat-rate pricing, so there are no surprises-just a guaranteed, spotless clean that helps you secure your full deposit and move on with confidence.
Ready to make your move completely stress-free? Let Shiny Go Clean handle the dirty work with our expert move-out cleaning services in the Madison area. Visit our website at Shiny Go Clean or call us at (608) 292-6848 to get your free quote and book your appointment today