Your Ultimate Madison Move In Cleaning List: 10 Essential Steps for 2025
- Dec 20, 2025
- 17 min read
Moving into a new home in Madison is exciting! Whether you're settling into a downtown apartment near UW, a family home in Fitchburg, or a lakeside property, the first step is making it truly yours. But before you unpack a single box, there's one crucial task: a thorough move-in clean. You never know what dust, grime, or allergens the previous occupants left behind. Tackling this before your furniture arrives is the secret to a stress-free start in your new space.
This ultimate move in cleaning list is your room-by-room guide to ensuring your new place is sparkling from the moment you get the keys. We've designed it to be comprehensive yet simple, covering everything from sanitizing kitchen appliances to wiping down baseboards and light switches. Following a structured plan means you won't miss a thing-which is especially important for tackling the dust that accumulates near the lakes or the grime tracked in during a slushy Madison winter.
A clean slate makes unpacking and settling in so much more enjoyable. As you plan your approach, you might wonder where to begin. Many find starting with the floors is key, and it's a great question to ask. For a deeper dive into that specific topic, many resources explore the benefits of cleaning carpets before you move into a new home, which can make a huge difference in air quality. Our checklist will guide you through the entire process, ensuring every corner of your new Madison home is fresh, sanitized, and ready for you to make memories in.
1. Deep Clean Kitchen Appliances
Tackling the kitchen appliances first is a non-negotiable part of any thorough move-in cleaning list. Even if they look clean, appliances can hide years of built-up grease, food splatters, and odors from previous occupants. A deep clean ensures a sanitary environment for your family's food preparation and helps the appliances run more efficiently from day one. This isn't just a quick wipe-down; it's a comprehensive sanitization of the refrigerator, oven, microwave, and dishwasher.
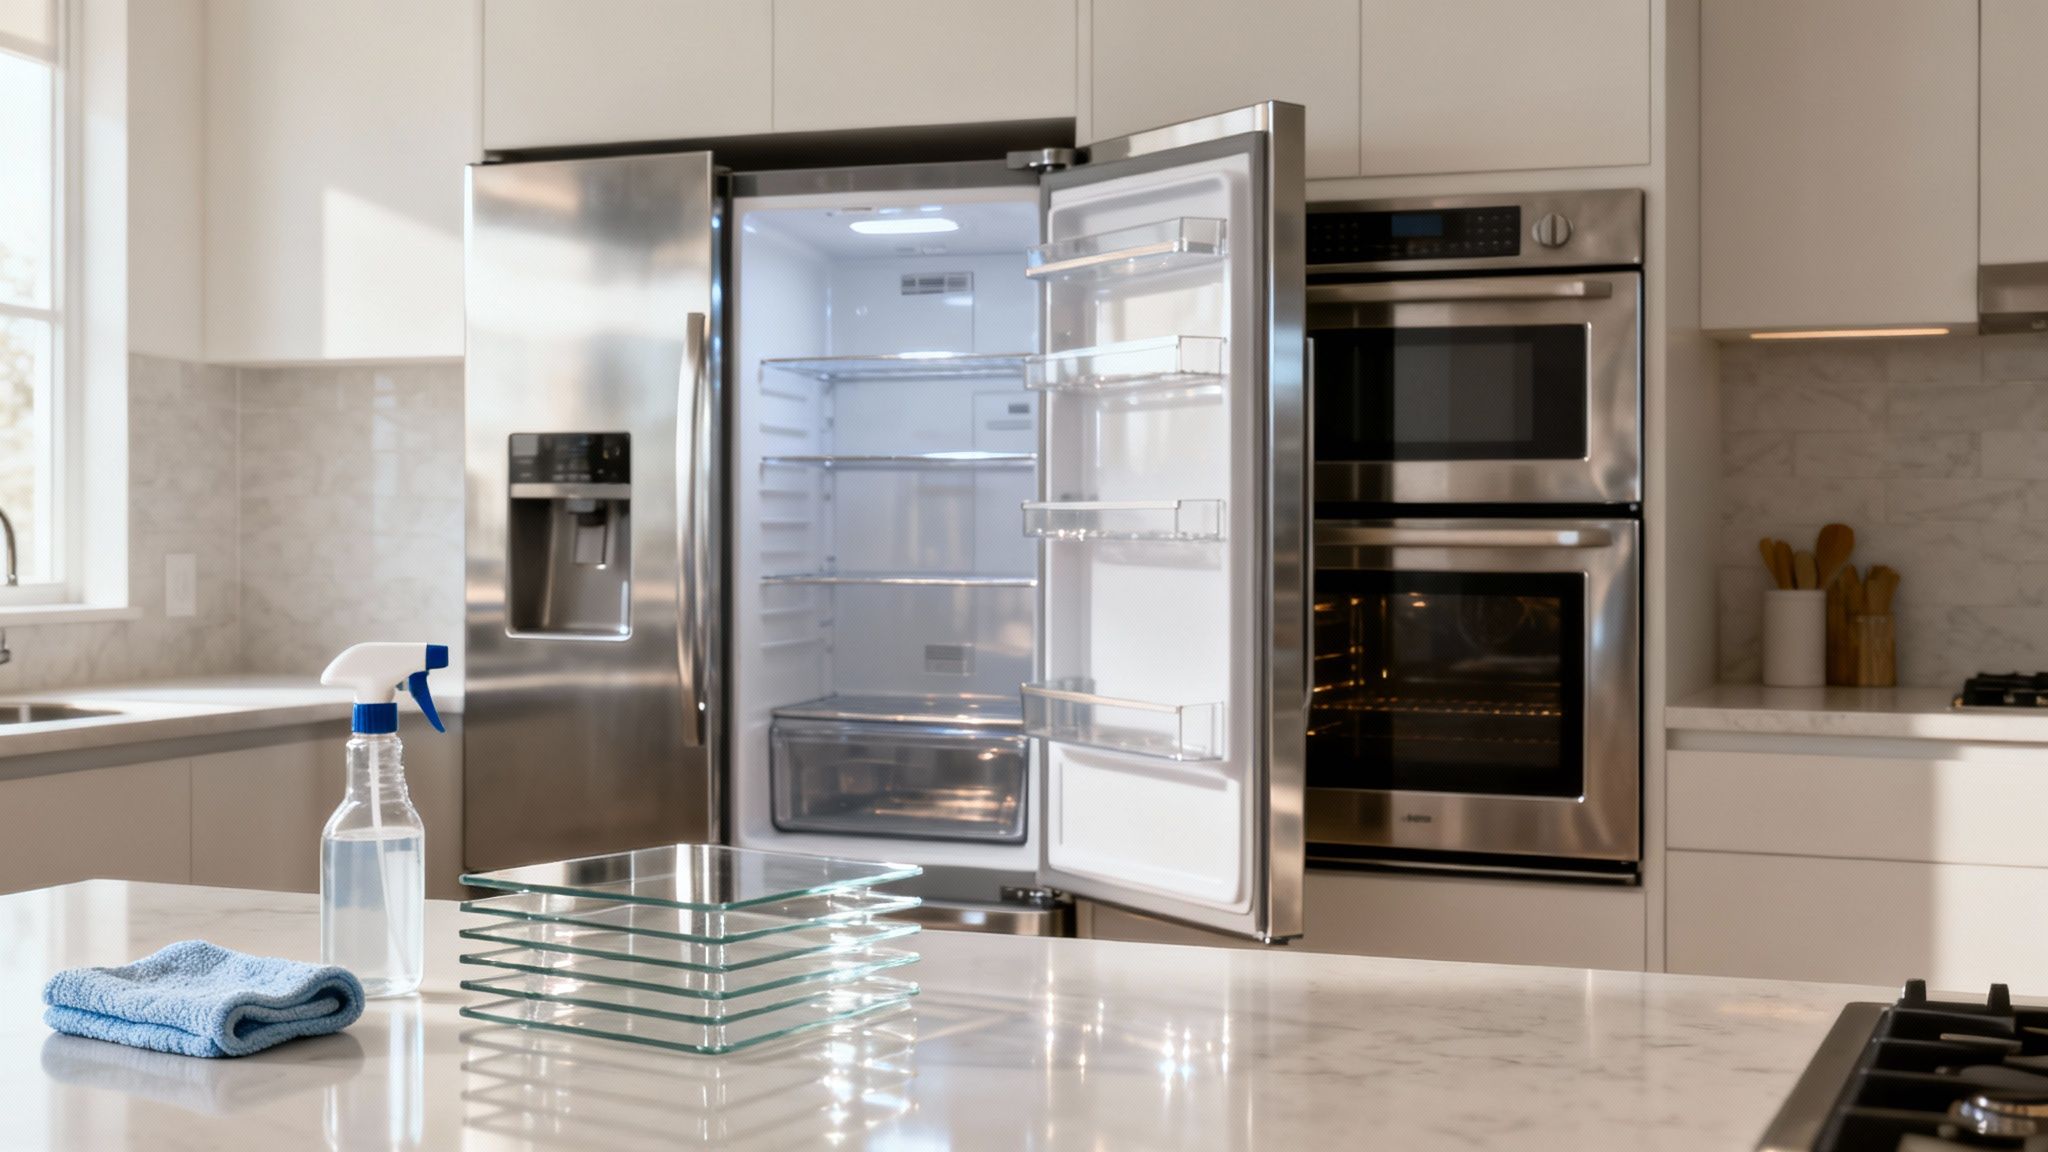
Starting with a blank slate in the kitchen provides peace of mind. Professional services, from real estate stagers to dedicated oven cleaning specialists in Madison, prioritize this step because it dramatically impacts the feel of the entire home. It’s the difference between a space that feels used and one that feels brand new.
How to Deep Clean Your Appliances
To get started, follow these targeted steps for each appliance:
Refrigerator: Remove all shelves, drawers, and detachable parts. Wash them in warm, soapy water and allow them to air dry. Wipe down the entire interior with a solution of equal parts water and white vinegar to disinfect and deodorize.
Oven: Run the self-clean cycle first, if available, to burn off heavy residue. Once cool, use a paste of baking soda and water to scrub any remaining grime. For those tricky spots between the glass panes, you can learn more about specialized oven glass cleaning techniques here.
Microwave: A simple trick is to microwave a bowl of water with lemon slices for 2-3 minutes. The steam will loosen caked-on food, making it easy to wipe away.
Dishwasher: Clean the filter at the bottom to remove trapped food particles. Run an empty cycle with a cup of white vinegar on the top rack to descale and sanitize the interior.
While focusing on the kitchen, don't forget other essential appliances. Ensuring laundry machines are ready is just as important for a smooth move-in. Following a complete DIY dryer vent cleaning guide is a critical safety measure that reduces fire risk and improves your dryer's performance.
2. Sanitize and Clean Bathrooms Thoroughly
After the kitchen, the bathroom is the most critical area to address on your move-in cleaning list. It’s a space that requires more than just a surface-level wipe-down; it needs complete sanitization to eliminate bacteria, mold, mildew, and soap scum left by previous occupants. A thoroughly cleaned bathroom not only looks and smells fresh but also provides a healthy, hygienic environment for your family from the moment you move in.
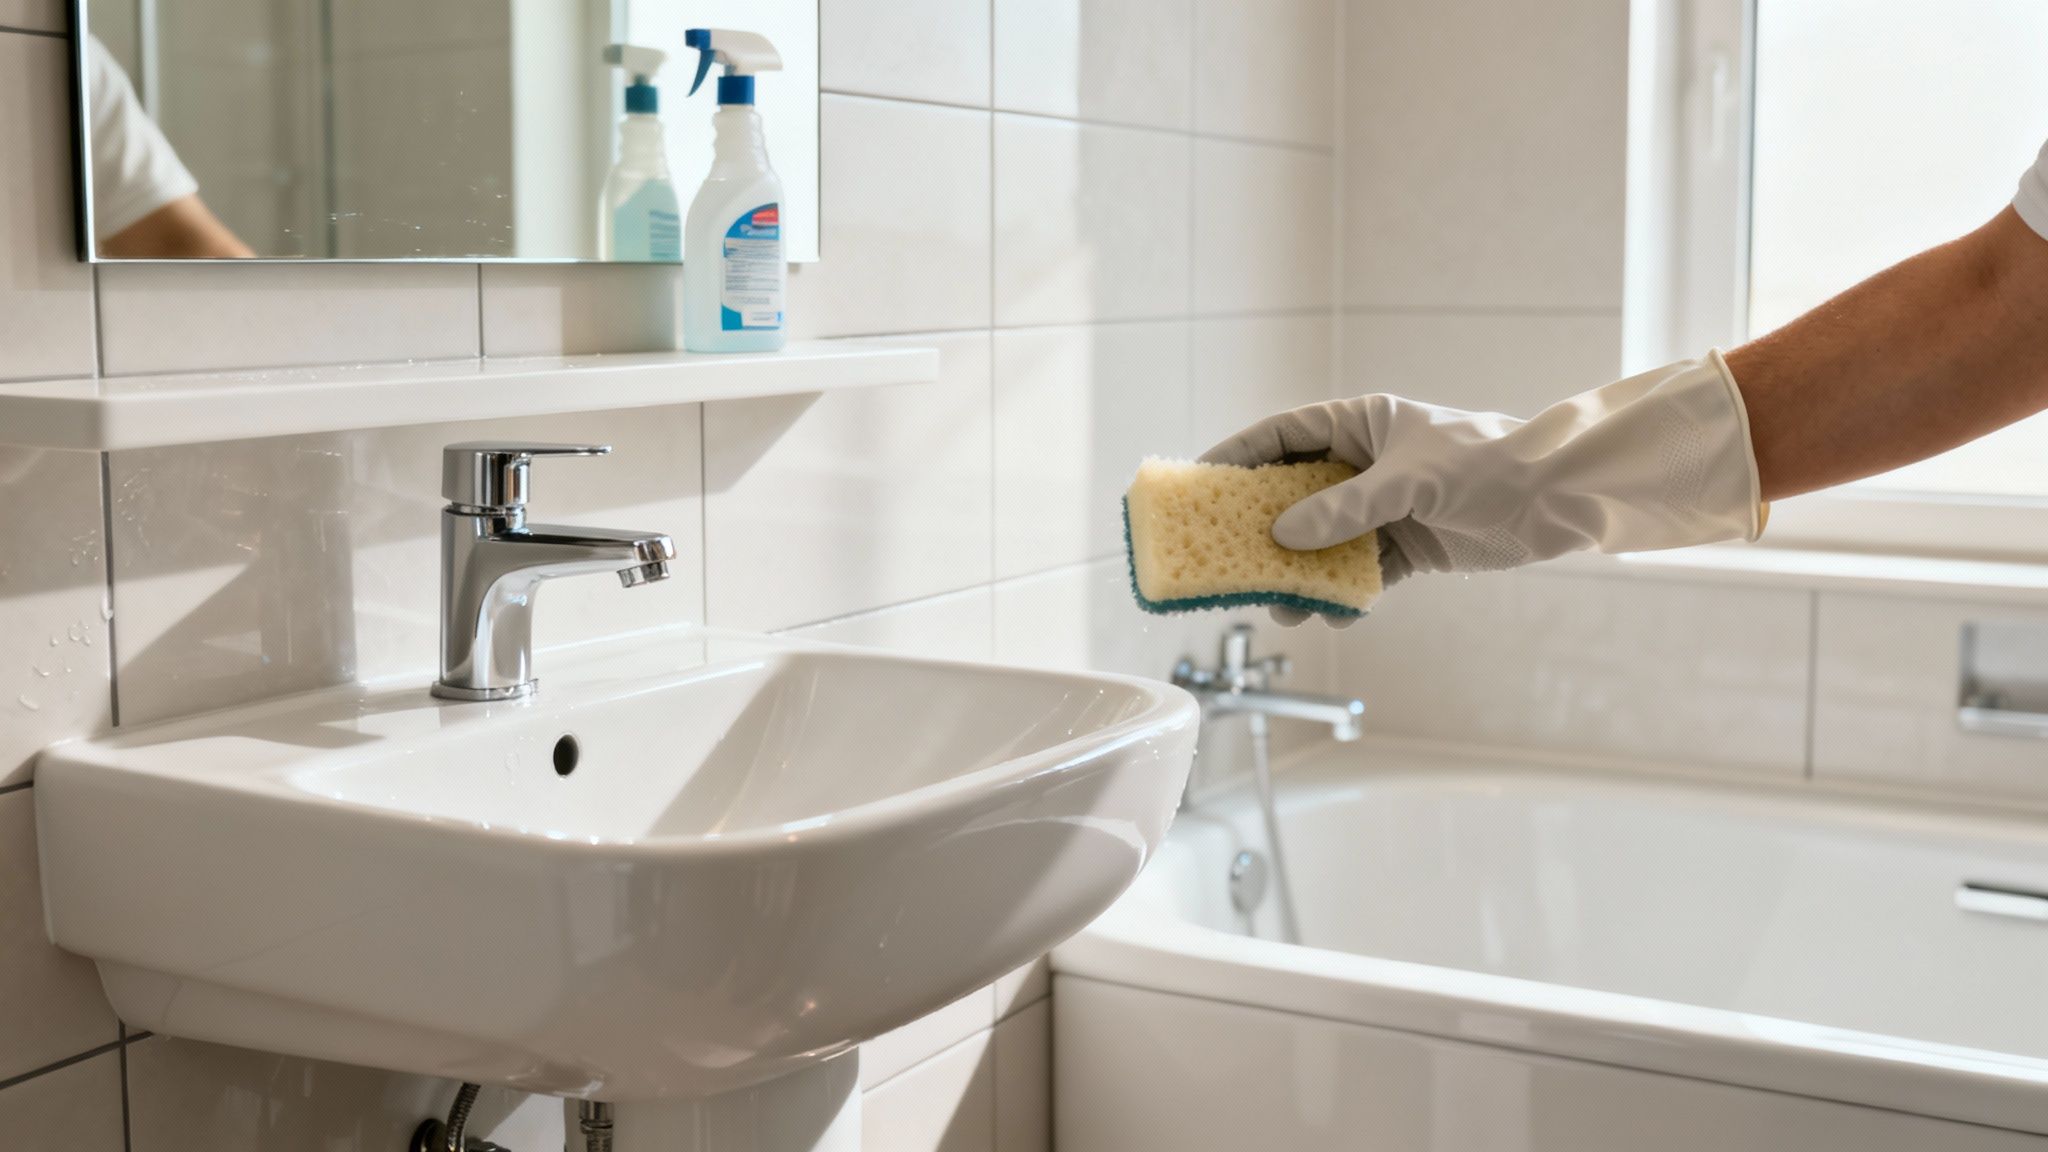
Starting with a pristine bathroom is essential for peace of mind. Professional services, from hotel housekeeping to a dedicated maid service in Madison WI, always prioritize intensive bathroom sanitation. This step ensures that every surface-from the toilet to the shower tiles-is safe to touch and use, making your new house feel like a clean and welcoming home.
How to Sanitize Your Bathrooms
To achieve a deep clean, focus on these key tasks for a sparkling and germ-free bathroom:
Toilet and Surfaces: Use a powerful disinfectant, like a bleach-based cleaner, to thoroughly scrub the inside and outside of the toilet bowl, including the base and behind the tank. Wipe down all countertops, sinks, and faucets with a sanitizing spray.
Shower and Tub: Apply a quality bathroom cleaner to the tub, shower walls, and doors. Let it sit for 10-15 minutes to break down soap scum and grime before scrubbing. Pay special attention to the grout lines, which can harbor mold.
Grout Lines: Use a stiff-bristled grout brush to scrub the lines between tiles on the floor and in the shower. This targeted effort removes buildup and prevents mold from spreading.
Floors and Fixtures: Mop the floor with a disinfecting solution, getting into all the corners. Don't forget to wipe down light fixtures, exhaust fans, medicine cabinets, and towel racks.
Tackling grout can be one of the toughest parts of a bathroom clean. For more targeted advice, you can avoid some common mistakes in bathroom grout cleaning with these tips.
3. Dust and Clean All Surfaces
Addressing all surfaces is a foundational step in any effective move-in cleaning list, transforming a vacant space into a fresh, welcoming home. Even in a property that appears clean, dust, cobwebs, and allergens settle on every horizontal and vertical surface, from ceiling corners to baseboards. A thorough dusting removes this hidden layer of grime, significantly improving indoor air quality and creating a truly clean canvas before you bring in your belongings. This isn't just a quick pass with a feather duster; it's a methodical, top-to-bottom cleaning of every nook and cranny.
Starting with a dust-free environment is critical for a smooth move. Professional real estate stagers and cleaning services in Madison prioritize this task because it instantly makes a home feel brighter and better maintained. It’s the difference between a house that feels forgotten and a home that feels cared for and ready for new life. For those sensitive to allergens, especially with the high pollen counts we see in Madison, this step is essential for comfortable breathing from day one.
How to Dust and Clean All Surfaces
For an efficient and effective dusting process, follow this systematic approach:
Start High, End Low: Always begin with the highest points in a room and work your way down. This ensures that any dislodged dust falls onto surfaces you haven't cleaned yet. Tackle ceiling corners, light fixtures, and the tops of door and window frames first.
Use the Right Tools: A microfiber cloth is your best friend. Its fibers are designed to trap and hold dust particles rather than just pushing them around. For high, hard-to-reach areas like vaulted ceilings or ceiling fans, an extendable duster is indispensable.
Dampen Your Cloth: Lightly misting your microfiber cloth with water or a gentle all-purpose cleaner prevents dust from becoming airborne and resettling elsewhere. This is especially helpful for baseboards, windowsills, and shelves.
Don't Forget the Details: Pay close attention to often-missed spots. This includes built-in shelving, mantelpieces, stair railings, blinds, and switch plates. Wiping these down ensures every part of your new home is pristine.
4. Clean Windows, Glass, and Mirrors
Tackling windows, glass doors, and mirrors is a crucial step in a move-in cleaning list that transforms the feel of a new home. This task goes beyond a quick spray and wipe; it’s about removing the grime, dust, fingerprints, and water spots left by previous occupants. Clean glass allows maximum natural light to flood your new space, making rooms feel larger, brighter, and far more welcoming from the moment you step inside.
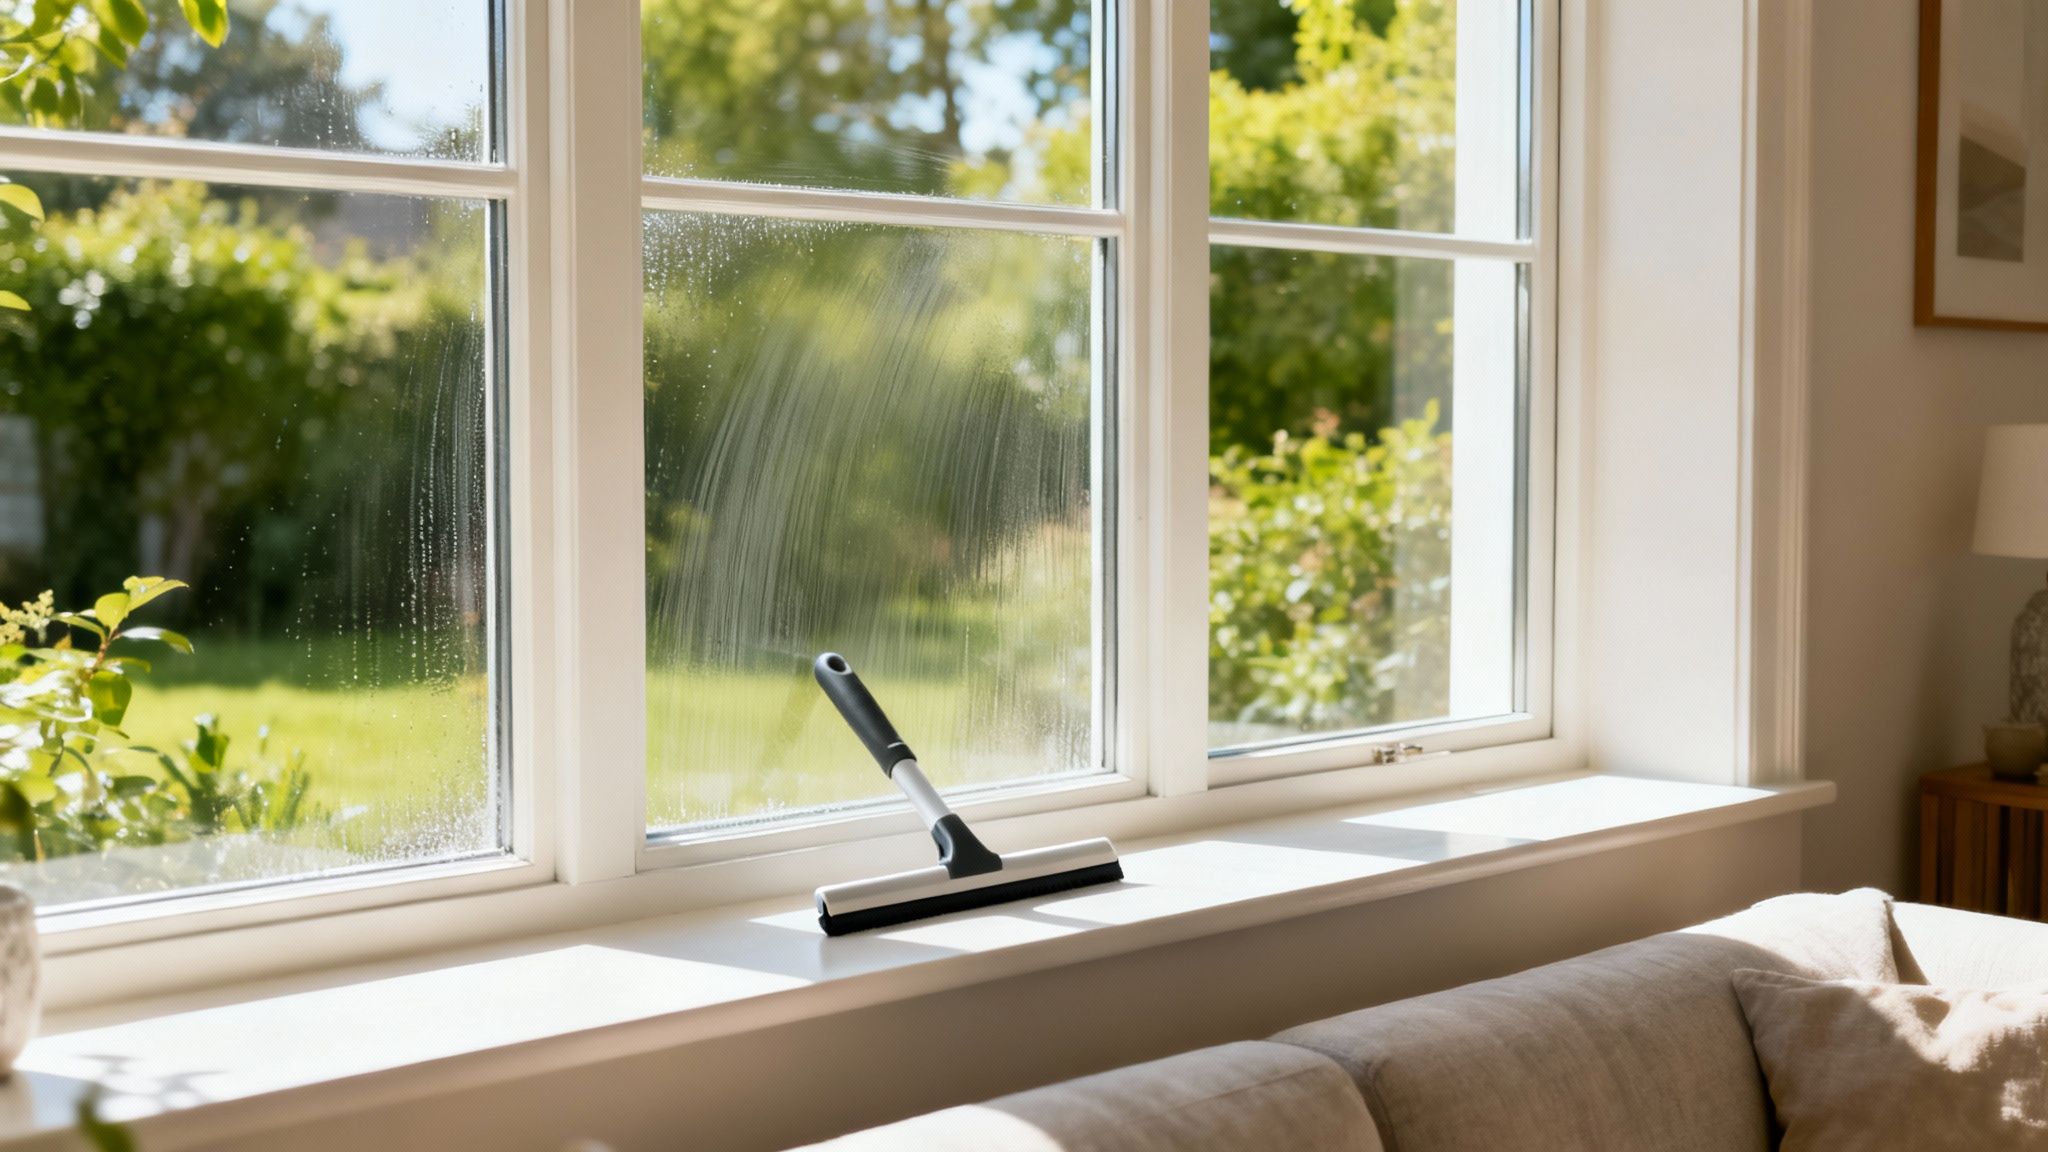
Starting with crystal-clear views connects your new interior with the outside world and erases the last traces of the previous residents. Professional move-in cleaning companies in Madison always include this in their packages because they understand its high impact. A sparkling clean shower door or a streak-free picture window instantly elevates the home from "used" to truly yours.
How to Clean Your Windows and Glass
For a professional-grade shine on every glass surface, follow these targeted tips:
Work on a Cloudy Day: Direct sunlight can dry your cleaning solution too quickly, causing frustrating streaks. An overcast day gives you more time to work for a flawless finish.
Use the Right Tools: A high-quality squeegee is your best friend for large surfaces like windows and glass doors. For mirrors, a microfiber cloth or even a crumpled newspaper can deliver a lint-free shine.
Clean Sills and Frames First: Before you touch the glass, wipe down the window frames, sills, and tracks. This prevents you from dragging dirt and dust back onto your freshly cleaned pane.
Mix an Effective Solution: A simple, economical solution of equal parts white vinegar and water in a spray bottle cuts through grease and grime effectively.
For more in-depth techniques, especially dealing with Madison's hard water spots or tricky window types, you can find a complete guide on how to clean windows without streaks here.
5. Disinfect and Mop All Floors
Floors are the foundation of your new home's cleanliness, and they bear the brunt of moving-day traffic and the history of previous occupants. A thorough disinfecting and mopping is an essential step on any move-in cleaning list, going far beyond a simple sweep. This process lifts away unseen grime, neutralizes bacteria, eliminates lingering odors, and removes allergens, creating a genuinely fresh and sanitary surface for your family and belongings.
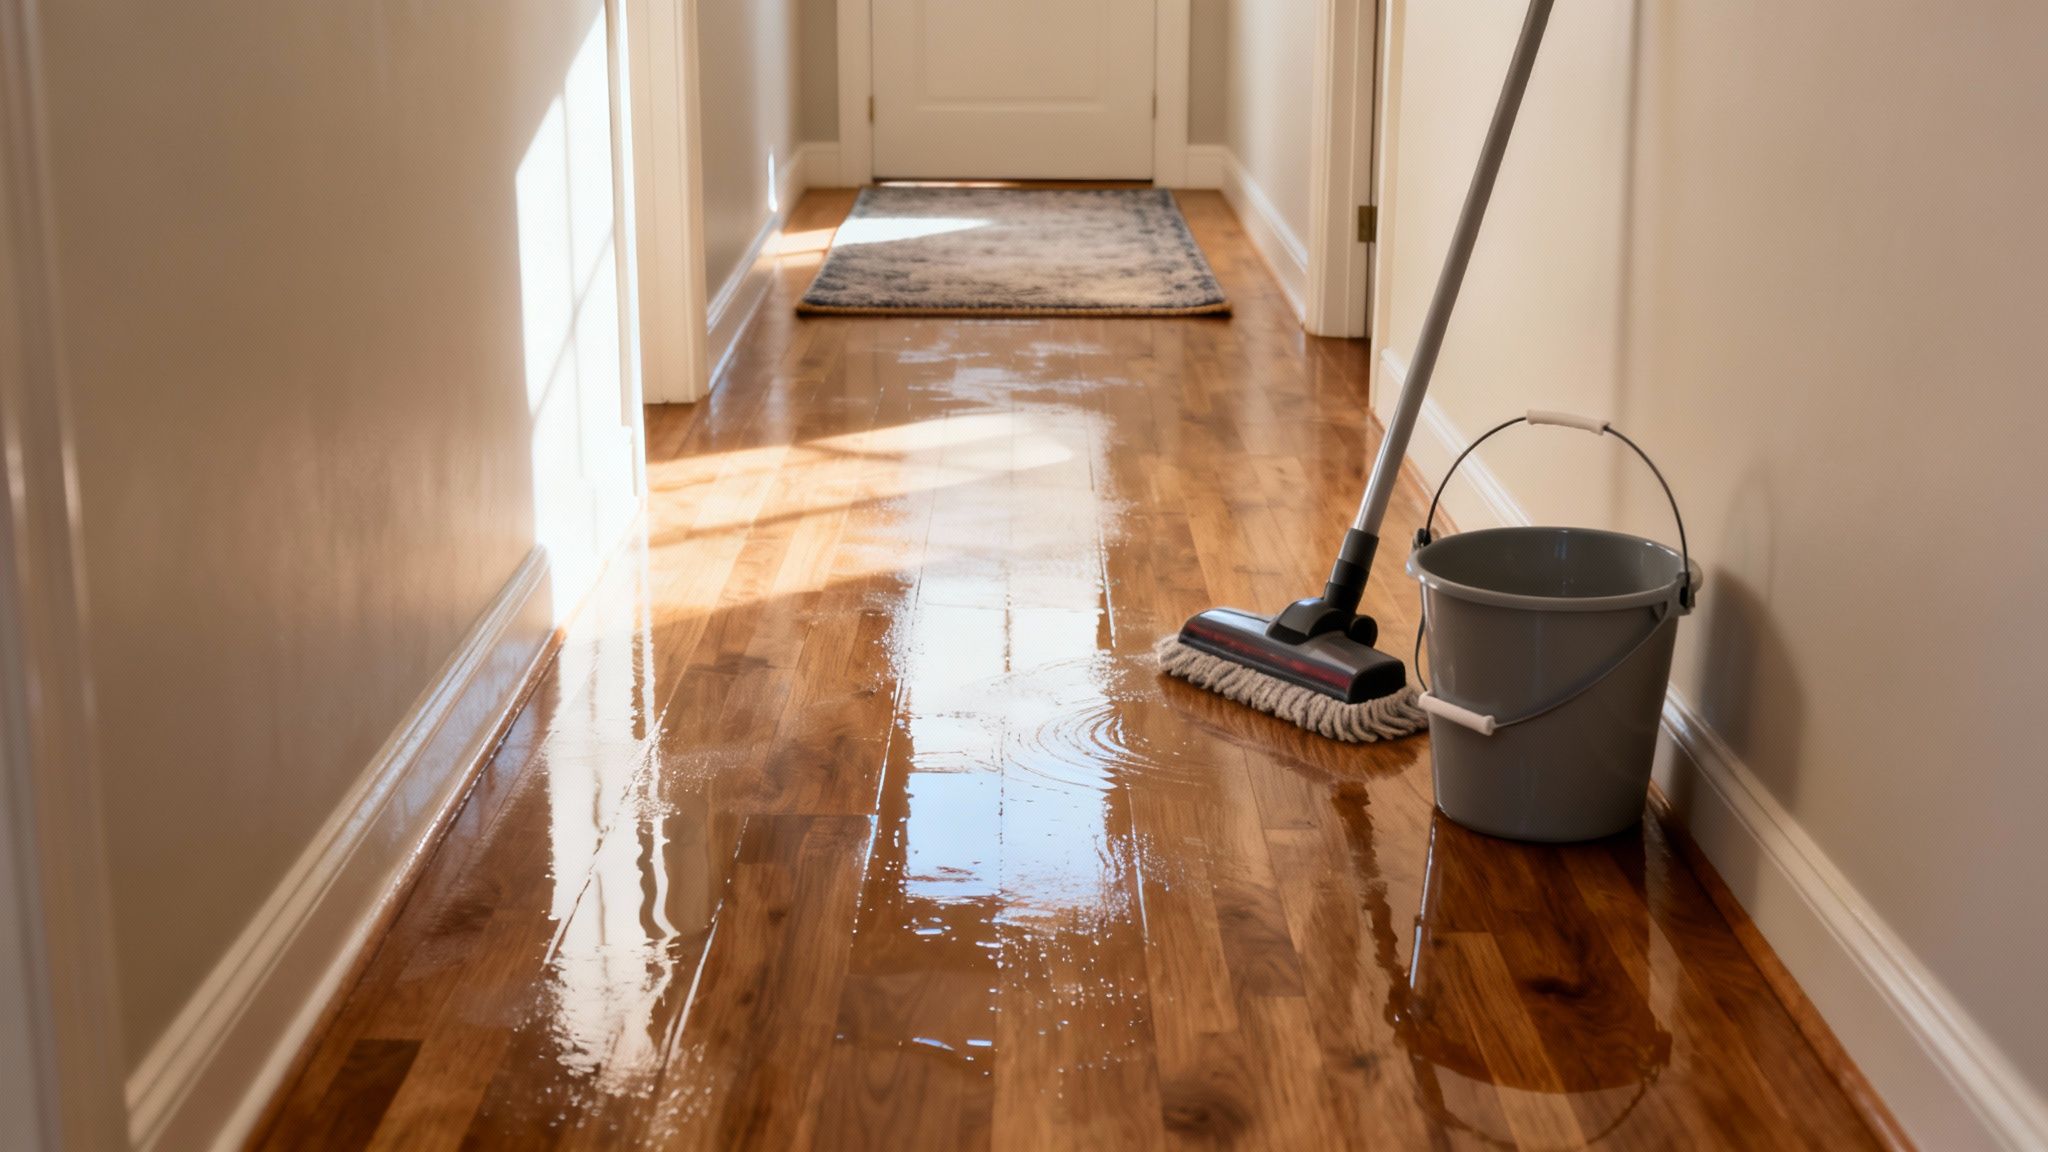
Starting with hygienically clean floors makes the entire space feel healthier and more welcoming. This is why professional services, from medical facilities requiring hospital-grade sanitation to high-end hotels, prioritize intensive floor care. It provides immediate peace of mind and ensures that when you place your furniture, you're setting it on a surface you know is completely clean.
How to Properly Clean and Disinfect Your Floors
To achieve a professional-level clean, follow this systematic approach:
Prep First: Always vacuum or sweep thoroughly before mopping. This removes all loose dirt, dust, and debris, preventing you from just pushing around grit with a wet mop. Pay close attention to corners and baseboards.
Choose the Right Cleaner: Match your cleaning solution to your floor type to avoid damage. Use a pH-neutral cleaner for hardwood, a gentle solution for laminate, and a designated tile and grout cleaner for bathrooms. For disinfecting, a properly diluted solution is key.
Mop Strategically: Work in small, manageable sections, starting from the farthest corner of the room and moving toward the exit. This prevents you from walking over freshly mopped areas. Change your mop water when it becomes visibly dirty.
Allow for Drying Time: Ensure floors are completely dry before walking on them or moving furniture in. Opening windows or using fans can help speed up the process and improve ventilation.
For an even deeper clean, especially in homes that have seen a lot of foot traffic or housed pets, consider renting a steam cleaner. The high heat effectively sanitizes surfaces without harsh chemicals, making it a great option for families with children or allergy sufferers. For a truly stress-free start in your new Madison home, let the professionals handle it. Booking a move out cleaning in Fitchburg ensures every surface, especially the floors, is sanitized and ready for your family.
6. Clean Inside Closets and Storage Areas
Closets and storage spaces are often overlooked in a standard cleaning, yet they are a critical part of a complete move-in cleaning list. These areas can accumulate dust, cobwebs, and lingering odors from previous owners. Thoroughly cleaning every closet, cabinet, and pantry ensures you have a completely fresh, debris-free space to store your clothing, linens, and personal belongings from the moment you unpack.
Starting with immaculate storage spaces is a foundation for an organized home. Professional organizers and real estate stagers always emphasize clean, empty closets because it highlights the home's storage potential and provides a truly blank canvas. It’s the difference between moving into someone else's old space and making a home feel entirely your own.
How to Clean Your Closets and Storage
To guarantee your storage is ready for your belongings, tackle it with these steps:
Empty and Vacuum: Start by removing any leftover items, hangers, or debris. Use a vacuum with a hose attachment to thoroughly clean all corners, shelves, and the floor, removing dust and cobwebs.
Wipe Everything Down: Using an all-purpose cleaner and a microfiber cloth, wipe down every surface. This includes shelves, hanging rods, baseboards, and walls. A solution of warm water with a few drops of mild dish soap works well.
Deodorize and Refresh: To combat any musty smells, place an open box of baking soda or a small bowl of white vinegar inside the closet for 24 hours to absorb odors.
Line Shelves: Consider applying fresh shelf liner or contact paper. This not only provides a clean surface but also protects both the shelves and your items from scratches or scuffs.
Ensuring every nook and cranny is addressed sets the stage for a smooth and organized move. For those preparing for a move out cleaning in Fitchburg, this step is just as crucial for getting your security deposit back and leaving the property in top condition for the next resident.
7. Wipe Down Doors, Door Frames, and Hardware
Doors and their hardware are some of the most frequently touched surfaces in any home, yet they are often overlooked in a standard cleaning routine. Including them in your move-in cleaning list is crucial for both hygiene and aesthetics. Wiping down every door, frame, and piece of hardware removes layers of fingerprints, grime, and germs left by previous occupants, ensuring every entry point to your new space is truly clean and sanitary.
This detailed cleaning instantly brightens a room. Think about how hotels prioritize polishing door hardware to give a sense of luxury and cleanliness, or how real estate stagers focus on these details to make a property feel well-maintained and appealing. Addressing these high-contact points eliminates a major source of hidden dirt and gives you peace of mind from the moment you walk through the door.
How to Clean Your Doors and Hardware
To properly tackle this task, you'll need a few supplies and a systematic approach:
Door Surfaces: For painted or wood doors, use a microfiber cloth dampened with a gentle, pH-neutral cleaner or a solution of mild dish soap and warm water. For stubborn scuffs, a magic eraser can work wonders. Be sure to clean both sides of every door.
Door Frames: The tops of door frames are notorious dust traps. Use a duster or the brush attachment on your vacuum to remove loose dust first, then wipe the entire frame down with your cleaning solution.
Hardware: This is the most critical part for sanitization. Use a good disinfectant wipe or spray on all doorknobs, handles, locks, and even hinges. Polish metal hardware with a cleaner appropriate for the material-like brass polish or stainless steel cleaner-to make it shine like new.
Natural Cleaning: A simple solution of equal parts water and white vinegar is effective for cleaning and disinfecting most hardware without harsh chemicals, but always test it on an inconspicuous spot first.
8. Clean Behind and Under Appliances and Fixtures
Often overlooked, the spaces behind and under major appliances are magnets for dust, grime, and forgotten debris. Pulling out the refrigerator, stove, and washing machine is a crucial step in a comprehensive move-in cleaning list. This deep-level cleaning removes years of accumulated filth, improves air quality, and eliminates potential hiding spots for pests, ensuring your new home is sanitary from the ground up.
This task is more than just sweeping; it's about addressing hidden problems before they become your problems. Pest control companies often recommend this step as a preventative measure, and HVAC technicians note that clearing dust from appliance vents improves efficiency and safety. It’s a foundational clean that guarantees no unpleasant surprises are lurking just out of sight.
How to Clean Behind and Under Appliances
Safely tackling these hidden areas requires a careful approach. Follow these steps for a thorough clean:
Safety First: Before moving any appliance, always turn off the power at the circuit breaker and unplug the unit from the wall. If dealing with a gas stove, ensure you know how to safely disconnect and reconnect it or hire a professional.
Protect Your Floors: Slide furniture pads, a thick blanket, or sturdy cardboard underneath the appliance's feet before gently pulling it away from the wall. This prevents scratches and gouges on your new floors.
Vacuum and Wipe: Use a vacuum with a hose attachment to remove all the loose dust, cobwebs, and debris from the floor, wall, and the back of the appliance itself. Afterward, use a damp cloth with an all-purpose cleaner to wipe down all surfaces.
Inspect and Assess: With the area clear, check for any signs of pest droppings, moisture, or leaks from water lines. Addressing these issues now, before you've fully moved in, can save significant headaches later.
9. Clean Walls, Paint, and Remove Marks
Walls are the canvas of your new home, and scuffs, stains, and old marks from the previous occupants can make the space feel worn and unloved. Addressing the walls is a crucial step in a move-in cleaning list because it creates a truly fresh, blank slate for you to personalize. This task goes beyond a simple wipe-down; it involves spot-treating stubborn stains, removing scuffs, and potentially doing minor paint touch-ups to restore a clean, uniform look.
Starting with pristine walls significantly brightens a room and makes your new home feel well-maintained. It's a detail that professional property managers in Madison standardize between tenants because clean walls directly impact the perceived value and cleanliness of the entire property. Taking the time to do this before furniture arrives ensures you can reach every corner without obstruction, setting the stage for a home that feels genuinely new.
How to Clean and Restore Your Walls
Follow these steps to get your walls looking their best:
Start with a Dry Dusting: Use a microfiber mop or a cloth-covered broom to remove dust, cobwebs, and loose debris from the walls and corners. This prevents you from creating muddy streaks when you start wet cleaning.
Spot-Treat Marks and Scuffs: For non-greasy scuffs on painted walls, a damp magic eraser is incredibly effective. For greasy marks, especially in the kitchen, use a gentle degreasing solution of warm water and a few drops of dish soap or white vinegar. Always test any cleaner on an inconspicuous area first.
Perform Paint Touch-Ups: If you have leftover paint from the previous owners, use a small brush to touch up any stubborn spots or chipped areas. Be sure the paint type (e.g., flat, semi-gloss) matches for a seamless finish.
Handle Textured Surfaces Carefully: Walls with texture can trap more dust and require a gentler approach to avoid damage. To learn more about the best methods, review this guide on how to clean textured walls in Madison without causing damage.
10. Sanitize Light Fixtures, Switches, and Outlets
Often overlooked, light fixtures, switches, and outlet covers are some of the most frequently touched surfaces in any home. Sanitizing these high-contact points is a crucial step in a comprehensive move-in cleaning list, eliminating germs, bacteria, and grime left behind by previous occupants. This task not only contributes to a healthier living environment but also brightens up rooms by removing dust from fixtures and making electrical hardware look fresh and clean.
Think about how often you flip a switch without a second thought-it’s a habit for everyone. This is why facilities where hygiene is paramount, like healthcare centers and schools, mandate the regular disinfection of these surfaces. Treating your new home with the same level of care ensures you’re starting on a truly clean and sanitary foundation. It's a small detail that makes a significant difference in how clean the home feels.
How to Clean Fixtures and Switches Safely
Safety and thoroughness are key. Follow these steps to get your fixtures and switches sparkling clean:
Prioritize Safety: Always turn off the power at the circuit breaker for the area you are cleaning before you begin. This is a non-negotiable step to prevent any risk of electric shock.
Wipe Down Plates: Use a disinfectant wipe or a microfiber cloth lightly sprayed with a cleaning solution to clean all light switch plates and outlet covers. Never spray liquid directly onto the outlet or switch.
Clean Light Fixtures: Carefully remove any glass or plastic covers from light fixtures and wash them in warm, soapy water. While they are off, use a dry microfiber duster or cloth to wipe down the fixture itself and the light bulbs.
Replace Old Bulbs: This is the perfect opportunity to replace any burnt-out or dim bulbs with new, energy-efficient ones to ensure every room is bright and welcoming from day one.
Test Everything: Once everything is clean, dry, and reassembled, turn the power back on and test every switch and outlet to confirm they are working correctly.
Move-In Cleaning: 10-Item Comparison
Task | 🔄 Implementation Complexity | Resources Required | 📊 Expected Outcomes & Advantages ⭐ | Ideal Use Cases | 💡 Practical Tips |
|---|---|---|---|---|---|
Deep Clean Kitchen Appliances | High — detailed interior/exterior degreasing | Degreasers, oven paste, stainless polish, microfiber, gloves, time | ⭐⭐⭐⭐ — restores performance, hygiene, odor removal | Move-in, pre-sale staging, long-vacancy prep | Use baking soda + vinegar, run self-clean cycle first, remove shelves |
Sanitize and Clean Bathrooms Thoroughly | High — intensive scrubbing & disinfection | Bleach/disinfectant, grout brushes, gloves, ventilation | ⭐⭐⭐⭐ — removes bacteria/mold, fresh scent, safer use | Rentals, hotels/Airbnb turnovers, move-in sanitization | Let cleaners dwell 10–15 min, ventilate, use grout brush |
Dust and Clean All Surfaces | Medium — systematic high-to-low approach | Microfiber cloths, extension pole, ladder, vacuum | ⭐⭐⭐ — improves air quality & visual cleanliness | Pre-unpack cleaning, showings, allergy-sensitive homes | Dust high→low, slightly dampen cloths, use extension pole |
Clean Windows, Glass, and Mirrors | Medium–High — exterior access may need ladders | Squeegee, glass cleaner/vinegar, microfiber, ladder | ⭐⭐⭐⭐ — increases natural light, clearer views, brighter rooms | Staging, seasonal deep-clean, homes with many windows | Clean on cloudy day, squeegee technique, clean frames too |
Disinfect and Mop All Floors | Medium–High — multiple floor types need care | Vacuum, mop & bucket, disinfectant, appropriate floor cleaner, steam cleaner (optional) | ⭐⭐⭐⭐ — removes pathogens & allergens, extends floor life | Homes with pets, allergy concerns, medical/guest prep | Vacuum before mopping, use correct cleaner per floor type |
Clean Inside Closets and Storage Areas | Low–Medium — reaching corners and shelves | Microfiber, vacuum attachments, shelf liners, small brushes | ⭐⭐⭐ — clean storage, prevents dust transfer to belongings | Organizing, move-in, staging closets for showings | Remove shelves to wash, line shelves, allow full drying |
Wipe Down Doors, Door Frames, and Hardware | Low — detail work on high-touch surfaces | All-purpose cleaner, disinfectant wipes, metal polish, microfiber | ⭐⭐⭐ — improves hygiene and entryway appearance | High-traffic homes, healthcare, staging | Clean both sides, sanitize handles, use material-appropriate cleaners |
Clean Behind and Under Appliances and Fixtures | High — may require moving heavy units safely | Wet/dry vacuum, furniture sliders, gloves, flashlight, possibly professional movers | ⭐⭐⭐⭐ — prevents pests, improves appliance efficiency, uncovers leaks | Long-unmoved appliances, pest prevention, maintenance checks | Unplug appliances, use sliders, check for leaks/pest signs |
Clean Walls, Paint, and Remove Marks | Medium — spot treatment or touch-up painting | Magic erasers, mild cleaners, paint & brushes, primer | ⭐⭐⭐ — removes visible wear; may need repainting for full restoration | Move-in prep, rental turnover, pre-sale touch-ups | Test cleaners first, keep paint codes, use magic eraser for scuffs |
Sanitize Light Fixtures, Switches, and Outlets | Low–Medium — electrical caution required | Disinfectant wipes, microfiber, ladder, replacement bulbs | ⭐⭐⭐ — sanitizes high-touch points, improves lighting function | Healthcare, schools, rentals, room turnovers | Turn off breaker before cleaning, replace bulbs, test after cleaning |
Feeling Overwhelmed? Let Your Madison Neighbors Handle the Cleaning
Moving into a new home is an exciting milestone, but it's also a monumental task. As you’ve seen from our comprehensive move in cleaning list, preparing your new space is a significant project in itself. The promise of a fresh start in a new Madison, Middleton, or Fitchburg home can quickly get buried under a mountain of cleaning supplies and a seemingly endless to-do list. The goal isn't just to make the place look clean-it's about creating a truly healthy, sanitized, and welcoming environment for you and your family from the moment you step inside.
Let's recap the essential takeaways from our guide. A successful move-in clean is built on a foundation of thoroughness and a strategic approach. It’s not just about wiping down countertops-it’s about sanitizing the hidden germs in kitchen appliances, scrubbing the unseen grime in bathroom grout, and eliminating allergens from every corner. From cleaning inside closets and cabinets before you unpack to wiping down every single light switch and door handle, each task contributes to a deeper sense of peace and well-being. This initial deep clean sets the standard for your new life in the home, ensuring you're not inheriting the dust and dirt from previous occupants.
The True Value of a Professional Move-In Clean
Following this detailed list guarantees a pristine home, but it also demands a significant investment of your time and energy-two resources that are incredibly scarce during a move. This is where the true value of mastering this process comes into focus: knowing when to delegate. Understanding the sheer scope of a proper move-in clean helps you appreciate the expertise and efficiency a professional service brings to the table.
Instead of spending your first weekend in your new home on your hands and knees scrubbing floors, you could be:
Unpacking and organizing your belongings at a relaxed pace.
Exploring your new neighborhood, whether it's finding the best coffee shop in Waunakee or a great park in Verona.
Focusing on the more exciting aspects of setting up a home, like arranging furniture and decorating.
The benefit extends beyond convenience. A professional team arrives with the right commercial-grade supplies, a systematic plan, and the experience to tackle everything efficiently. They know how to handle the specific challenges of Madison homes, from the fine dust that blows in from the lake areas to the deep cleaning required after a long, cold winter.
Your Fresh Start, Simplified
Your move should be a moment of joy and anticipation, not stress and exhaustion. By outsourcing the deep clean, you are essentially buying back your time and preserving your energy for the more personal aspects of settling in. Imagine walking into your new home for the first time, and instead of seeing a list of chores, you are greeted by sparkling floors, sanitized bathrooms, and the fresh scent of a truly clean space. That feeling-the confidence that every surface is hygienic and ready for your family-is priceless. It transforms the entire moving experience from a grueling chore into a celebratory beginning. You deserve to start this new chapter on the best possible foot, in a home that feels brand new from day one.
Ready to reclaim your time and ensure your new Madison home is spotless from the start? Let your friendly neighbors at Shiny Go Clean handle the entire move in cleaning list for you. Call us at (608) 292-6848 or visit Shiny Go Clean to get your instant, flat-rate quote and book your service online in minutes.